Bliss Carmen. The Kinship of Nature. Boston, L.C. Page & Company, 1913.
via: The Internet Archive
Well, I’m working on a somewhat bigger project, but there’s always some side projects you can do. First is two bracelets:

©Giliell, all rights reserved
A matching one for the Archipelago Necklace, though the upper band turned out a bit too thick

©Giliell, all rights reserved
The other one has got blue and gold pieces in it. Sometimes I just pour leftover resin on a silicone mat and swirl the colours around. Then I cut up the result when it hasn’t hardened completely and use the pieces in other projects.
So much for the fun…
… now for the failure.
I wanted to make a freeform dish/sculpture with seashells and lights. What I didn’t consider was that it’s considerably warmer now than it was when I made the last ones, which means that the resin cures much faster. So I poured my resin in the evening and tried to form it the next morning, but it had cured so much that it would no longer bend but tear.

©Giliell, all rights reserved
Fuck. And it was soooo pretty. I have some ideas to recycle at least part of it.
I want this knife to be special because the blade deserves it. That means not only patined fittings but also decorations. So I have decided to do some filework – definitively on the tang spine and possibly the belly too.
However, I did not do a lot of filework yet. I did some, but that was twenty years ago and not only was it rubbish, but I have also already forgotten everything I learned back then.
So I am in this conundrum – I really want to make something I know I am not good at making. So I have decided to do today a practice day. I took a piece of mild steel, ground it to roughly the thickness of the tang, straightened it and I went on to figure out the hows and whats.
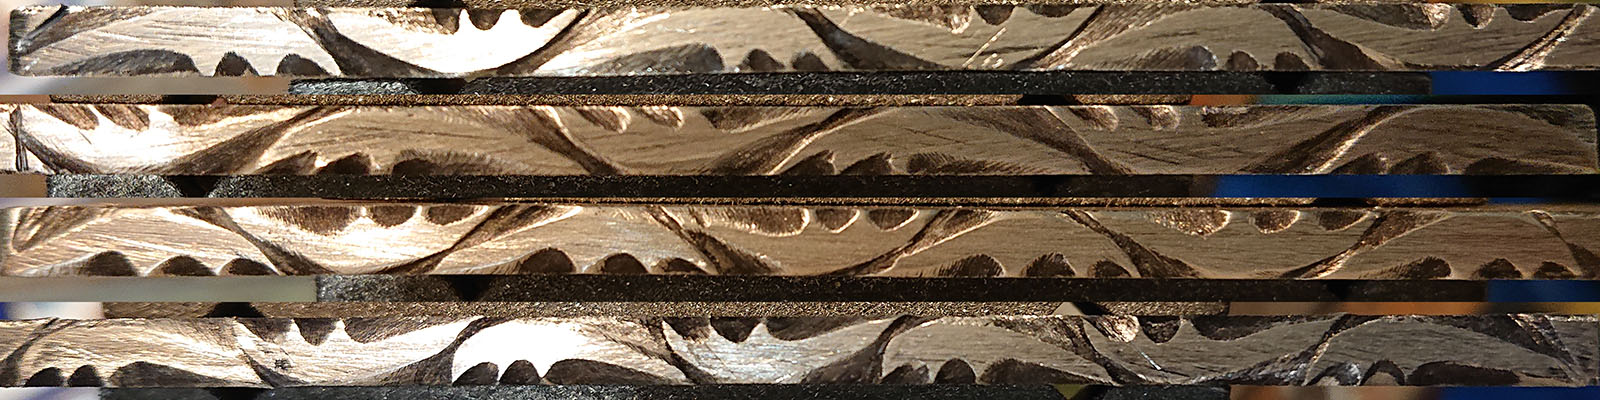
© Charly, all rights reserved. Click for full size.
What you can see here from top to bottom is a progression both in time and (I hope it can be also seen) in quality. The top one took me over two hours, the last one under one hour. Whilst the photo magnifies all the little imperfections to an unreasonable degree, there is still definitively a lot of space for improvement, some issues are still visible even at arms-length viewing distance.
I am bloody nervous about doing this because if a file slips, there is no way back. It was a huge problem for the first three patterns actually – establishing the first cut was the biggest issue I had. Files have angled teeth and they cut best when drawn perpendicularly to the edge. When you run a file at an angle, not only has it a tendency to slip and wander off, it also behaves differently when used left-handed as opposed to right-handed. Once the cut is established, all these problems are a lot less pronounced, but establishing that first cut precisely where you need it to be and at the right angle is a major PITA.
For the fourth pattern, I have finally found out how to best establish that initial cut. I have a beat-up knife made from an old saw blade in my workshop, that gets used for all those jobs a knife is good for but simultaneously not advised for. Like putting the edge on a piece of steel and hitting the spine with a hammer, to establish a cut line in the metal surface. Which is what I did here. Essentially like a center-punch for drilling. And just like center-punching prevents drill bits from wandering, line-punching prevents files from doing the same.
Now to beat my anxiety and to convince myself that I can do this…

Source Unknown. An English Woman’s Love Letters. Chicago, Donohue Bros. (190-)
So, the blade came out of the etch just spiffing, and giving it dark bluish-grey patina with tannic acid made it look really cool and mean, almost tacticool. But it is, of course, no longer shiny. Which made me think a lot about how to proceed from now on.
As you know, this is my first time working with damascus. Up until now, I have worked either with carbon mono steel or stainless mono steel, either with mirror or satin finish. Making the fittings on such steels from new brass, aluminium or steel is perfectly OK and does not detract from the blade. But making fittings shiny on this blade would feel, as we say in Czech, “jako pěst na oko” (like a fist punch in the eye). I do not have any spare damascus or mokume gane to go with it, nor the means and knowledge to make them, so what can I do? And the title, of course, gives away what I have decided to try – to make the fittings out of brass and make a patina on them.
So I went to my personal library, took out my favorite book “Chemistry for everybody” (published in CZ in 1990) and looked up the recipes in there. Then I looked a bit around the internet too. And then I went and bought a lot of pre-made commercial solutions for the job… NOT.
I looked up which chemicals that I already have could kinda-sorta emulate what the book says should be used for copper, brass and bronze and then I have of course performed a series of experiments to try whether I can make my own solutions. And the results are pleasing. And because there are a lot of pictures in this, the rest is below the fold.
The cygnets of Edinborough are growing quickly and Anne, Cranky Cat Lady’s daughter, Emily Davis, has sent us an update.
The cygnets are looking more swan-shaped, look at their long necks!

June 20/20, ©Emily Davis, all rights reserved

June 21/20, ©Emily Davis, all rights reserved

June 21/20, ©Emily Davis, all rights reserved

June 21/20, ©Emily Davis, all rights reserved

© Charly, all rights reserved. Click for full size.
She was carrying the dead beetle for several meters already when I caught up with her, and she still had several meters to go. And it was by no means easy to get a sharp picture, but she took a breather for a moment here.
If you have ever wondered where end all those insects and little critters that you step on in your garden – now you have an answer.

George Duval. The Romance of the Sword. New York, The Merriam Company, c1895.
I think I mentioned before that one of my BFFs is looking for a house and we’d all like it very much if that house was close to us. Now, the “estate” we’re living in was mostly built in the 60s and 70s, which also means that now lots of those houses are changing their owners as the original owners are too old to live alone, the houses are too big, or they die, and the children have long since moved into their own homes, wherever those are. Which is exactly how we bought ours. Another house has turned up on the market after the owner died and on Saturday the heirs had a combined garage sale and house visiting day.
While the house certainly has potential, it is too big and too expensive for my friend who is single, but the garage sale was a very nice thing for another friend and me. Old people tend to have a lot of near indestructible tools .

©Giliell, all rights reserved
Several chisels, a wire brush, two plumber wrenches, several files, tin pliers, a small planer and two hammers. Not shown: a 2m spirit level and an electrical meat carving knife. All together for 35 bucks, the plumber wrenches alone would cost me more.
My friend’s wife and my husband knew what would happen as soon as they saw the tools and they resigned in their fates.
Well, now that I am down to only one blade, I can at least concentrate on it. So I did and today I have polished it all the way to 7.000 grit. There is still cable damascus on the very tip, but I have decided against making the knife shorter again and I will go with it as it is. The cable damascus is hardened and in composition similar to the 1095, so it will still cut and hold an edge well.

© Charly, all rights reserved. Click for full size.

© Charly, all rights reserved. Click for full size.
Now it will sit in FeCl3 for a while.
Initially, I have used still relatively concentrated solution (~1/10 dillution of solution for printed circuit boards) to see where the 1095 is. Now I am using a very diluted solution (~1/100) for the final etch, because etching this works a bit differently than etching damascus made from two kinds of steel where one has high nickel content. Why is that?
As a former chemist, I know at least a bit about what is going on now so I can show off.
The way etching works on carbon steel like this is an electrochemical process. The impurities gather during the forging process at the boundaries between the various steel layers and those impurities make the steel in those areas more susceptible to chemical attack because they create a sort of microscopic electric cells that attract the ions from the solution to the area. That is why in the etch with the more concentrated solution the cable steel quickly turned all grey and the 1095 remained all silvery – the 1095 is a mono steel with very few impurities uniformly spread throughout, whereas the cable, whilst being similar to the 1095 in chemical composition, has most impurities concentrated at the boundaries between former cable strands and at the boundary with the 1095.
In a concentrated solution, the reaction happens too quickly and can lead to pitting in areas with inclusions or more impurities. And a layer of various oxides builds up, leading to blotchy, uneven etch. That is ideal for revealing where the mono steel in the sandwich is, but not so great for showing the grain boundaries.
A diluted solution gives the reaction more time to attack the steel more evenly, but it of course also takes a lot longer. I probably won’t risk letting it sit in there overnight, but it will take hours. Allegedly the smiths of times bygone have used fruit (citrus, apple) juices, and it took a very long time, but I do not have several pieces to make a scientific study of it. Although, I might just cut the failed pairing knife into several pieces and perform an experiment….. Hm. I will think about it, that would be one way to get some knowledge and some fun out of a failure.

Charles Stedman Newhall. Ruthie’s Story. Philadelphia, Presbyterian board of publication, 1888.
You may remember these resin pieces that resemble areal views of coastlines. At the time I mentioned that while I love the pieces, they are a bit too small to make an impactful necklace on their own, so I had to figure out how to combine them. One issue here was colouring. How do I get a consistent blue colour if I used different batches of resin? Now, one opportunity would be to very, very carefully weigh the resin every time and very carefully count the drops of colour I pour in. Yeah, I can’t see me do that either. Also, the risk of just squeezing the tiny paint bottle a bit too much is pretty high, so I tried something else: “Normal” resin is two components, the resin and the hardener, that react with one another and cure over time. I just mixed the resin part with the blue colour in an old marmalade jar and then took out 12 grams whenever I did a batch of “islands” and added the hardener to the already coloured part. I only did this for the blue resin, because the metallic pigment isn’t that sensitive to small differences in the amount of colour.
That little trick turned out really well and I must remember it for other projects. That way I ended up with a handful of fairly similar pieces in terms of colouring. I selected the ones I wanted to use, drilled holes on them and somehow messed up the surface. Not much, but the shine was gone on some pieces so I polished them a little and then added some more resin on top. Quite often that’s easiest way to get a really shiny surface again. Also it created a concave surface which breaks the light differently, taking away the sharp edges on the land mass, and I really like that because it creates a more “natural” look since coasts are rarely terraced.
Once I had all the pieces ready I needed to assemble them and of course I have enough beads to stock a small shop but none that were a good match for these pieces. Luckily I found the perfect fit on Etsy, it just meant waiting a couple more days before I could finish. It’s the closest I’ll get to the sea this year and I absolutely love the result.

©Giliell, all rights reserved
The one thing I don’t like are the dull drill holes in the outer pieces. I think I’ll try to carefully add s tiny bit of resin. This would also fix the to the wire and thus prevent the fastening from sliding to the front over the course of time. I still have some rectangle pieces that await assembly and some earrings to finish.