A Big Commission – Part 2 – New Magnetic Thingamajig

My magnetic chuck for grinding bevels  works well and I am still using it but it is unsuitable for establishing the bevels on a huge blade like this. I have actually been thinking about this for some time, and the kukri commission was in the end just a suitable excuse to play for two days with magnets and exercise my grey matter a bit.

The thing I came up with was a combination of a magnetic jig and the sharpenatrix. That alone could not work because it does not allow me to get as close to the belt as I need. And also it has a fixed length, so in certain positions, the blade like the kukri would actually be partly above the tallest point on the belt. Thus I established that I need:

  1. a telescopic arm
  2. a switchable permanent magnet

Both of those things can be bought, sometimes even in conjunction. But they are really expensive and for my purposes, even the cheapest and smallest ones are needlessly bulky and heavy. Yes, at long last, finally a chance for me to just dick around with various scraps and it is really economic use of my time!

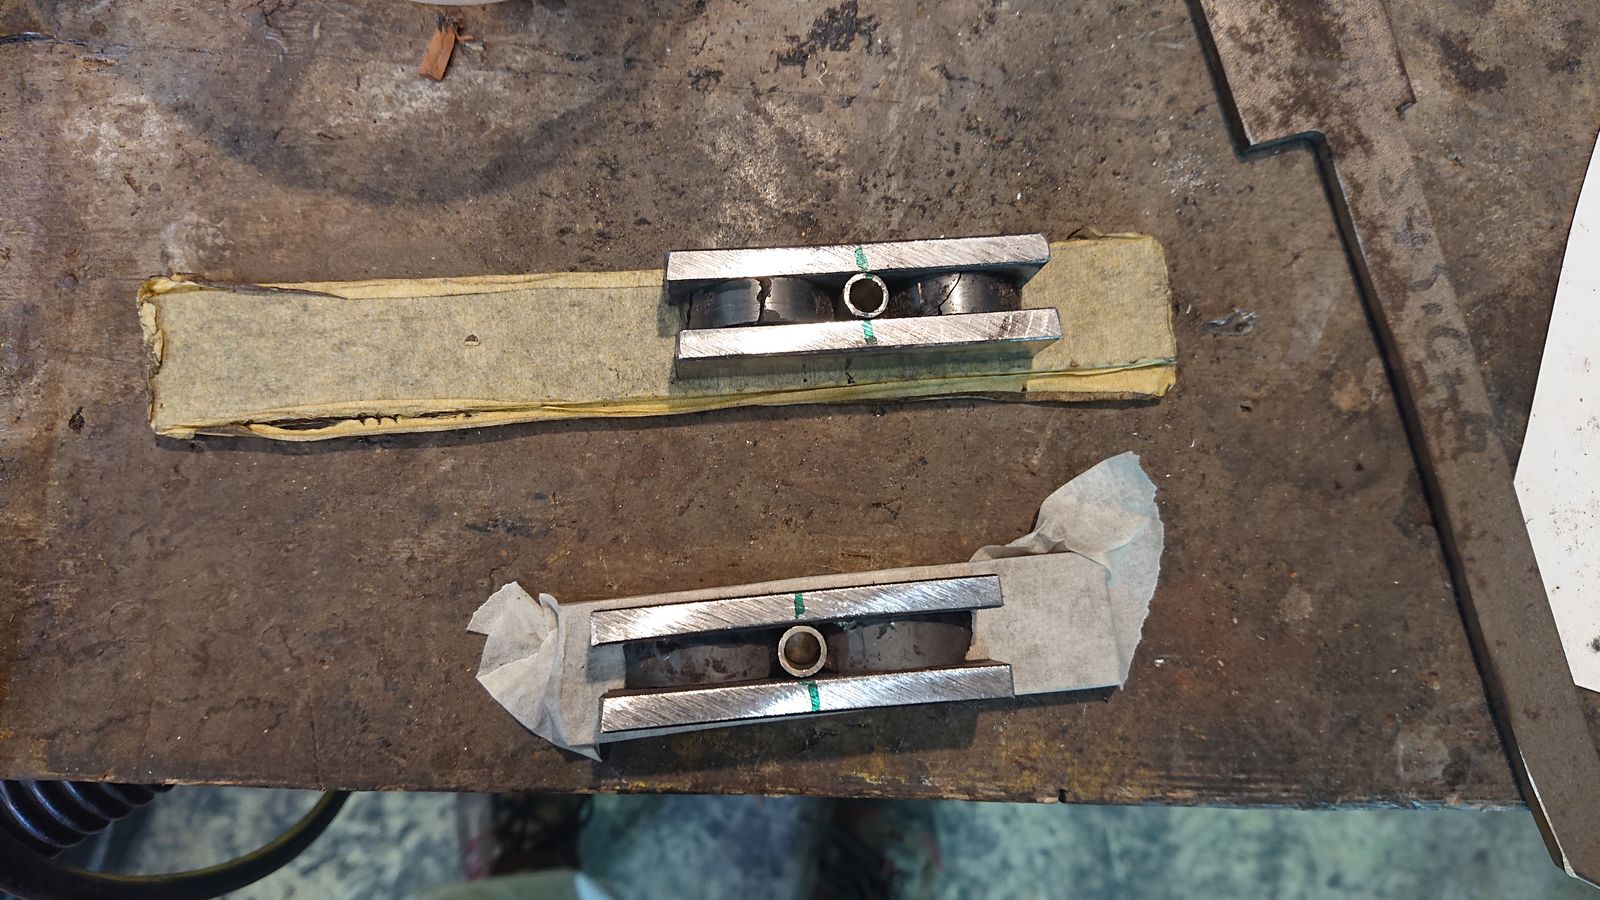
After some trial and error, I have gotten the best results with just two magnetic arrays from two broken speaker magnets and four flat pieces of mild steel from a broken clamp.

© Charly, all rights reserved. Click for full size.

The magnets are oriented in both arrays with the north in the same direction on both sides of the pipe in the middle. And since they were broken into irregular pieces, I have glued them in with a mixture of steel dust and epoxy to better facilitate the transfer of the magnetic field into the steel. With one exception – the side that is going to hold the workpiece has a bit of brass between the steel bars, so the magnetic field does not extend there all the way to the surface between them. The piece of stainless steel non-magnetic pipe in the middle allows me to connect the two magnets with an axis around which they can swivel freely. When the poles of both arrays are aligned, they repulse each other but the whole assembly sticks to steel on the sides very strongly. When they are misaligned, the whole thing is nearly non-magnetic all around.

© Charly, all rights reserved. Click for full size.

Here you can see me testing it. A threaded copper rod is fixed to one of the magnetic arrays and will connect it to the telescopic arm later on. A stainless, non-magnetic steel rod is also fixed (riveted) into that magnetic array. The second array can rotate freely on the top. At this stage, I got my first bonus – both extreme configurations are stable without the need for any mechanical locking mechanism and the outward magnetic force builds up/disappears quickly, not gradually.

© Charly, all rights reserved. Click for full size.

Now you can see it nearly finished. The telescopic arm consists of several parts:

  1. the 8 mm copper rod with stainless steel nut fixed into the array
  2. thin 12 mm steel tube lined with 10 mm brass tube in the upper half to ensure a tight fit for the copper rod.
  3. 10 mm steel rod with thread at the end on which the ball from sharpenatrix can be screwed
  4. 2 screws go through threads in two pieces of thicker tube and through all the tubing to lock both the steel and the copper rods in fixed positions. There are brass inserts under each screw to ensure they do not scratch the surface of the rods. Hopefully.

The knob was only added so I do not poke myself with the sticking screw during work and it turned out to be a second bonus – it allows me to hold onto the blade with one hand and comfortably hold and switch on/off the magnet with the other.

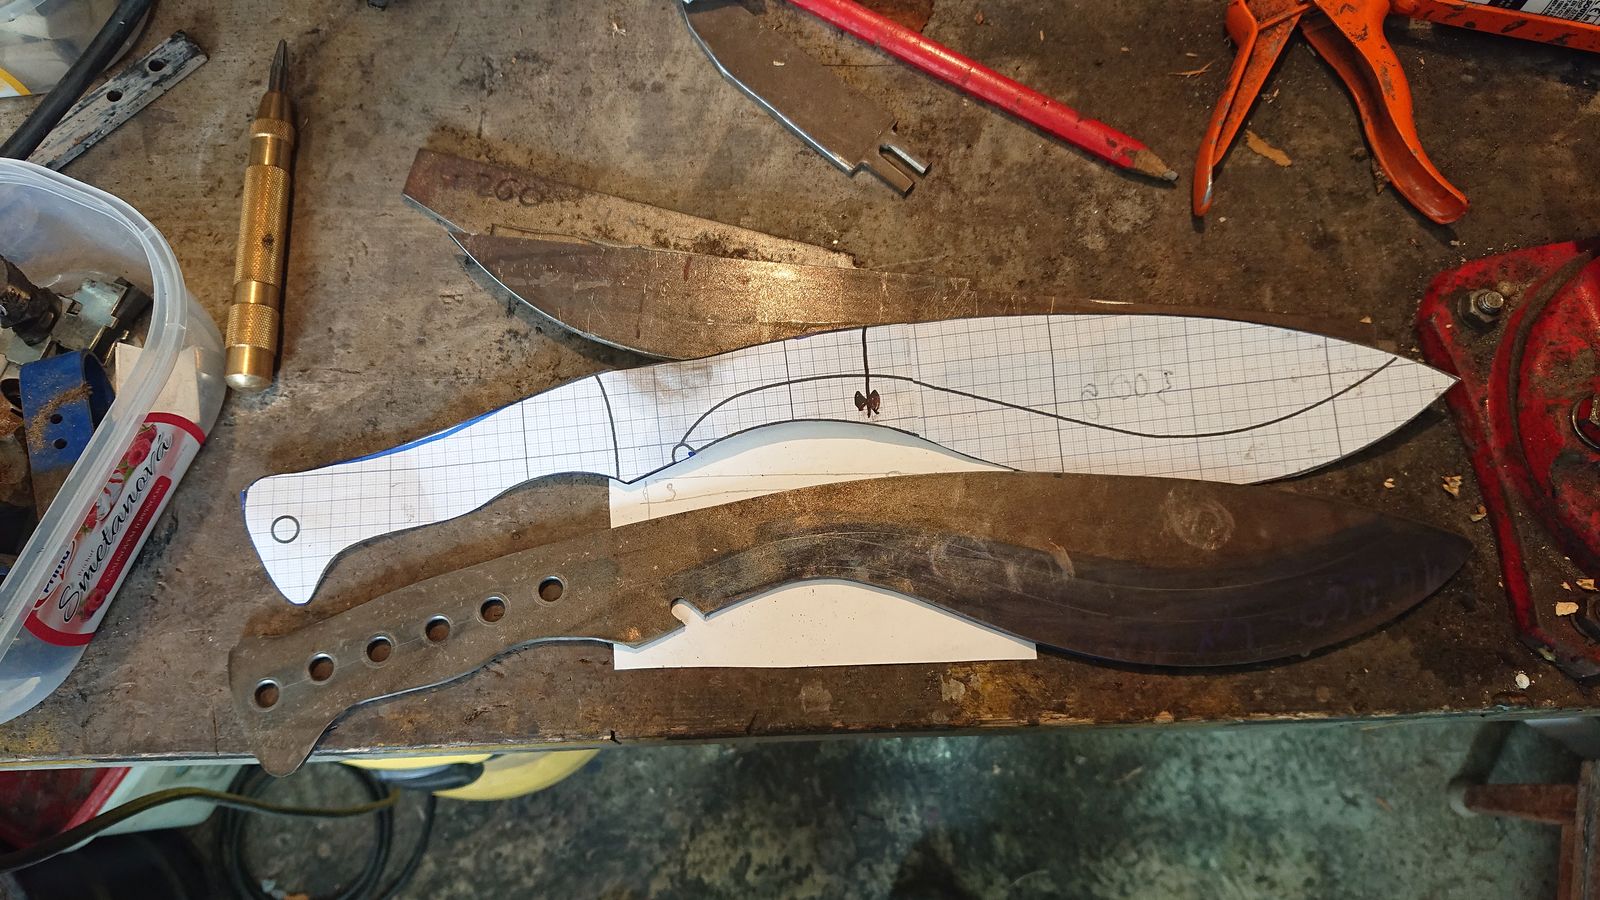
With that, the arm was not finished yet, but it was functional, so I went on and tested it. And it worked really well. Not ideally, but it did help a lot, especially with a complicated grind like this. Kukri changes the blade width over the lenght of the blade, so to reduce the weight, keep it strong, and optimize the cutting capability towards the end of the blade the primary bevel has to be steeper on the wider portion of the blade than on the narrow part. So I had to grind it in two steps. The first step was to establish the less- steep bevel on the whole blade (approx 5°).

© Charly, all rights reserved. Click for full size.

The second step was to establish the steeper bevel on the wide portion of the blade whilst carefully feathering it into the narrow portion. The grind on the intermediate portions is a bit funny-shaped, which I will have to correct with a file. Later during polishing (this will only go to 100 or perhaps 120 grit), it will smoothen out, I did make blades like this already, although not of this size and not with a belt grinder.

© Charly, all rights reserved. Click for full size.

I made this grind in about an hour, which is speedy, especially considering that I was working with a new jig. I slipped up on two parts on the other side before I figured out how to best use it, but nothing that would not be corrected in polishing.

As a final touch, I have encased both arrays in alluminium housing so they do not gather steel dust. And I painted ON/OFF markings with a sharpie to have visual clues during work.

© Charly, all rights reserved. Click for full size.

If it were a bit stronger, I would not have those two slip-ups that I had, but it is strong enough to be useful – it has over 2,5 kg lifting force, which is in my opinion impressive given that the initial magnets on their own have barely lifted anything.

© Charly, all rights reserved. Click for full size.

Overall I am very pleased with the result. I now know how to make small switchable permanent magnets. I still have some ordinary black magnets to play with, but I will probably also buy some small neodymium magnets and build myself a variety of magnetic holders with high force. Even a small flat magnetic plate can cost several hundred €. With some care and planning, I think I could make a useful one myself for a fraction of the cost in just a few days.

Showing off My Wood – Part 1

In case you have been wondering about what I was doing for these last two months, I was cutting wood.

I have not planned on making knives for a living, not consciously at least, but I have been hoarding various kinds of wood for crafting for over two decades by now. It was very disorganized, for some pieces I have never known the exact species and I had to guess it now with varying degrees of certainty, and most of it was not immediately useful – mostly logs and branches of various sizes and thicknesses. I wanted to cut the wood into prisms for a long time, but for that to happen I had to 1) have a saw that would allow me to do that and 2) the weather must be suitably dry but not extremely hot for a significant amount of time because I need to work outdoors, my shop is not big enough. And this year both of those things finally coincided. I have now a big-ish table saw and the weather was suitable long enough. I also had the additional incentive in the rising prices of firewood that I have mentioned previously.

Table saw is not ideal for this kind of work, a band saw would be better and safer. But I have managed it without an accident, all my appendages are still appendaged and I did not have any serious kickbacks (two moderate ones I admit) or even near-incidents either. I am terrified of tablesaws since childhood, so I am very, very careful around them. That is one of the reasons why it took me two months, appart from the huge amount of wood that I had to process – I have taken breaks whenever I felt that my attention begins to fade, which was after two hours of work at most.

So now let’s dive into it and show you my wood – in no particular order (actually the order is alphabetic but in Czech).

This will be a series, otherwise it would be waaay toooo loooong.


Black elder (Sambucus nigra)

© Charly, all rights reserved. Click for full size.

© Charly, all rights reserved. Click for full size.

Light-colored wood with small pores. Not very rot resistant, so many pieces have visible damage from fungus and insects – some in an interesting way, some might still just end up heating the house. I have a lot of it, even a lot of completely healthy pieces. When worked, it stinks to the high heavens. Finished wood has a nice creamy-white-yellow color, when treated with ammonia the yellow becomes even more pronounced, becoming canary yellow, almost light orange.


Birch (Betula pendula)

© Charly, all rights reserved. Click for full size.

© Charly, all rights reserved. Click for full size.

I do not have big enough pieces to make whole kitchen knife sets, but I have enough smaller pieces with an interesting small burl or wavy pattern to make several dozens of puukko and possibly some wooden jewelry too. I also have some pieces that might be worthy of a chef’s knife, but most of them will be puukko. Birch has creamy white wood, very hard but not rot-resistant. Ammonia does change it to light brown.

© Charly, all rights reserved. Click for full size.

© Charly, all rights reserved. Click for full size.

I also managed over the years to get my hands on a few impressively thick pieces of birch bark, not only the papery outer layer. The thick bark is very hard and it does have an interesting pattern. It can be a bit brittle under tension, but it holds up under compression well, so it can be used as a spacer between the bolster and the handle, or for stacking handles.


White Oak (Quercus sp.)

© Charly, all rights reserved. Click for full size.

© Charly, all rights reserved. Click for full size.

© Charly, all rights reserved. Click for full size.

I have a small box of handle scales cut out from crotch wood that I sorted out from firewood, although not very many. I also have a box of smaller pieces and several big-ish pieces of spalted and insect-damaged oak root balls from several smaller trees that died standing in the forest and I poached them from there several decades ago (it is legal to take dead wood from the forest here, but it must lay on the floor and only up to 7 cm in diameter). Those could make very interesting knives and knife blocks.

© Charly, all rights reserved. Click for full size.

And then I have a big pile of prisms cut from an old church cross, here is just the tip of the woodberg. Enough for dozens of knives including blocks – from masive wood. This oak wood is mostly light brown, it can be made dark brown or nearly black with ammonia.


Garapa (Apuleia leiocarpa)

© Charly, all rights reserved. Click for full size.

I have written about this in one previous post. I am not 100% certain about having the species identified correctly, but this is very dense and very hard wood with tiny pores, which is typical for wood from the family Fabaceae. It looks very promising, but unfortunately, all the pieces are of the same dimensions – 30×30 mm. That limits the type and shape of the knife handle that I can make. Even so, I do have enough for several knife sets including blocs. I have no idea how it behaves and how it reacts to ammonia treatment, I will have to find out.


Hawthorn (Crataegus sp.)

© Charly, all rights reserved. Click for full size.

I was surprised to find this wood in my pile. I have no idea where and how I got it, it was probably in the pile of wood that I got from my cousin about twenty years ago. He worked at that time in park maintenance and got his hands on various species. It is hard and dense wood, but that is all I know, I haven’t made anything from it yet. One of my neighbors has several relatively freshly dead hawthorn trees on his property, I consider asking him if I could have some of them for crafting. It appears to be moderately interesting wood.


Apple (Malus domestica)

© Charly, all rights reserved. Click for full size.

I have one small box of smaller pieces of burl, root, and crotch wood. There could be some very interesting knife handles in there.

© Charly, all rights reserved. Click for full size.

© Charly, all rights reserved. Click for full size.

I also have a lot of healthy apple wood, enough for several knife blocks and dozens of knives. But I will probably use it as a veneer for the blocks, I do not have that much. It is very prone to insect and fungus damage, so I had to toss a lot of it. But there is an upside to that too.

© Charly, all rights reserved. Click for full size.

The upside is that I have several huge pieces of interestingly colored spalted apple wood, enough for luxury high-end cutlery sets. I am doing some research in that regard and I am coming to interesting – and favorable – conclusions.

Apple has small pores and not very distinct growth rings. I do not think I have many pieces with the heartwood-sapwood boundary because the sapwood was destroyed by wood borers and cracked, but I have enough heartwood to make some really interesting and pretty stuff. I do not know how apple responds to ammonia treatment yet. I suspect it would turn dark brown to nearly black.

That’s all for today, there will be several more posts.

Corona Crisis Crafting: This Time for Real

Well, sitting in a chair making tiny movements is something that still works, so I made jewelry, what else…

©Giliell, all rights reserved

©Giliell, all rights reserved

This set predates my Covid infection. It’s polymer clay with so called silkscreen stencils.


Who’s a good little fire demon? Calcifer from Howl’s Moving Castle is one of the sweetest half-villains ever conceived.

©Giliell, all rights reserved

©Giliell, all rights reserved

©Giliell, all rights reserved

Come swimming in a sea of flowers. Yes, those roses are hand made. Yes, I know. My sister got a matching pair.

©Giliell, all rights reserved

Come to the beach with me. This was a cane made after a Youtube tutorial and I really like the results.

©Giliell, all rights reserved

©Giliell, all rights reserved

©Giliell, all rights reserved

©Giliell, all rights reserved

And last but not least, some beadwork: The Sungoddess

©Giliell, all rights reserved

A Big Commission – Part 1 – Beginning

I got a new commission via the sign on my garden gate. Maybe if I did not live at the end of a road in the middle of nowhere I would have gotten more business that way, but a little is better than nothing.

The customer initially asked me if I could harden a kukri machete that he has bought and found of insufficient quality. My reply was that it might be possible, but only if the steel is good enough and only the quench is botched, not if the steel is craparooni as well. After a bit of back-and-forth, he brought me the bad kukri together with one that belongs to his friend and that he initially intended to buy.

Both machetes are from the same company. I won’t tell you their proper name, but it could be paraphrased as “Low-Temperature Carbon-Iron Alloy”.

The bad one was manufactured allegedly in Africa (the country was not specified) and it is really bad – it has no primary bevel, so it is essentially just a sharpened flat bar. The hardness is about 50-51 HRC, so it is hardened. But this is the lowest point where it might be useful as a cutting tool – with very frequent sharpening. Which would be difficult with steel this thick and this type of grind.

The good one was manufactured in the USA and it is in my opinion still bad, although not as bad as the first one. It does at least have primary and secondary bevels, so there is no need to remove excessive amounts of material when sharpening.

I took a picture of the good one, proposed a few design modifications, and made an outline and a price offer.

© Charly, all rights reserved. Click for full size.

Since this is supposed to be a working tool, we agreed that there is no need for high polish or any excessive fancifulness. On the other hand, there should be some fancifulness since a handmade product is going to be expensive regardless. So there will be a jatoba handle with hidden pins and a dyed leather sheath with a pocket and natural sharpening stone. The offered price is about ten times higher than what the manufacturer of the original has charged, but I do hope that I can deliver a product worthy of that expense.

© Charly, all rights reserved. Click for full size.

I have already cut the outline from 4 mm spring steel and then I got distracted. I could grind the bevels freehand, I do have the skill to do so. But I thought to myself – I might need to make a second one if the first one cracks in quench, I might get more requests for big blades, so it probably is worth to spend some time making a jig. And today, I started to make that jig.

More about that when it is finished.

Third Wooden Mystery

I did not expect these pieces to be mysterious but they are.

© Charly, all rights reserved. Click for full size.

I got these as logs with circa 10-15 cm in diameter  from my neighbor. He got a permit to fell some trees on the premises of a nearby former sanatorium when there were some conservation works performed and he also got a lot of wood when trees on his property were felled during roadside renovations. So he got a jumble-mix of local species from the roadside and some imported park species from the sanatorium.

I swapped a few nice pieces of wood with him for briquettes. At the time, I thought these are just pieces of European oak (Quercus robur) and indeed I almost tossed them when I got my hands on old oak boards which are easier to work with. But I cut them into prisms anyway and I got confused.

The bark and very small and densely packed growth ring do look like oak, but there the similarity ends.

The boundary between heartwood and sapwood is very pronounced. In this regard, the wood is more similar to walnut trees, although it could be oak too.

Walnut has more chocolate-dark-brown heartwood whereas this has a purplish tint to it. And locally grown walnuts have way bigger growth rings in my experience – easily three-four times bigger in fact, even on branches. And walnuts, irrespective of the growth ring size, have a big cellular pith in the middle, whereas these had almost none (like oak).

The sapwood also seems too white for European oak, which is more yellow-brown-ish. On its own, the sapwood looks like ash, but ash does not have a differently colored heartwood and it too has much bigger growth rings, although they could be this size on branches.

The sapwood was almost completely destroyed by wood borers, even though the wood was stored in dry conditions the whole time. I did not have a lot of wood borer damage on any other wood that I was storing (except basswood, elm, and ash, none of which is this).

And all the wood borers stopped at the heartwood boundary as if by magic. I have observed this phenomenon on elm and oak trees that died standing in the forest.

The lignin rays are visible but way smaller than they are in oak. In this regard, the wood is similar to beech or sycamore. But it also could be an oak branch and not an oak trunk.

It is pretty wood, it would make nice knife handles, but I do not know what it is for sure and that is a bit of a problem. All I know for sure is that it has grown within 200 m of my house and I am about 90% sure it is not local species because most of those I can recognize at a glance. Thus by process of elimination, I think it might be Northern red oak (Quercus rubra), but I cannot be sure since I never held a piece of definitive red oak in my hand and internet search is of limited use here.

But it fits the known criteria – it is grown around here, there is a huge tree nearby, it sometimes even sprouts in random places from nuts buried by jays (I have a seedling in my garden), and it is not local species.

A Funny Manifestation of the Christianity Brain Rot

The YouTube algorithm tries occasionally push religious ads on me and one has made me literally laugh out loud recently. It is a very badly animated clip (CGI like from the 90s) showing a row of Marvel and DC comics superheroes who bow/salute to something. The camera progresses along the line from Spiderman through Thor, Hulk etc., and finishes with Superman. Then it turns around and reveals that they are bowing to a yuuuge cross on a hill and the caption reads “Jesus – the real superhero”.

The most amazing thing to me is that somebody apparently sat down, thought about it, and concluded that this is a persuasive argument. “Look at all these fictional characters with ridiculously overblown and unrealistic powers. And this last one, with the most ridiculous and overblown powers of them all, this one is real and you have to believe it because those fictional ones pay him respect”. How can anyone think that this is even approximating some sort of logic? How can anyone be persuaded by this?

I think that even if I have seen it as a kid, the only thing that I would conclude from that ad is that Jesus and God are fictional characters. I think that the very existence of that advertisement demonstrates that religion in general and Christianity in particular rots the brain and stunts the ability to reason. I haven’t seen dafter thing in a while.


Well, here we are: finally caught Covid

positive Covid test

©Giliell, all rights reserved

When I woke up this morning with a lightly sore throat and a headache, I didn’t think any of it. After all, I’d had a terrible night. Last night some guy rang our doorbell at about 10 p.m. and asked if our caravan was for sale (it’s currently parked in front of the house) and only accepted “no” number five, so all night I woke at the lightest sound, afraid that somebody would steal it.

I went to work where a colleague told me that her husband caught it and her son, who is my pupil, probably as well. I still shrugged it off, but did a routine test (which we are officially no longer allowed to have). Now, this part is important: I always do my swabs thoroughly. No “just touching the nose lightly”. At first I only saw the C line. I put it to the side as I was expecting a phone call and forgot about it. When I looked again after 20 minutes or so, there was the faintest line visible. Not sure if I was hearing the fleas cough, I did a second one. This time I poked the swab down my nose as far as I could. On that second test, the T line appeared before the C. The conclusion is double:

  1. Don’t assume “yes it says 15 minutes, but it’s still clean after 5 so it’s ok”
  2. Taking your sample well is important.

Now, so far I still only have a sore throat, headache and a bit of being groggy, but we’re also in a heat wave, that doesn’t help. The kids and Mr are clean so far. Let’s hope it tays that way. Of course I’m missing the fun week at school again…

Crafting: polymer clay

I’m currently a bit confused, as I wanted to do this post as a follow up to the last one on polymer clay, but it turns out I didn’t write that one, despite me remembering the post. Well, just imagine that you read the first part of this post 4 weeks ago or so.

Having seen gorgeous shit on social media, I decided to do some polymer clay jewellery. I did a lot of it as a kid/ young teen, but the style back then was pretty different. I saw some tutorial on youtube and decided to go for a calaidoscope cane.

two pairs of earrings. Each earring consists of two square parts with the same pattern: colourful shapes wrapped in black, all symmetrical.

©Giliell, all rights reserved

Now, while I liked the results, I didn’t like two things: One, it’s very material intensive. That was easily 10 bucks worth in polymer clay and if you fuck up that’s it.

Two: You end up with lots of the same. I can understand why there’s a lot of small businesses making polymer clay jewellery: You can actually create things within a reasonable time in a way you can’t do with beads. But I’m just making stuff for myself and friends and family,  so I don’t need 50 pieces with the same pattern.

So I thought: This was nice, but I’m not going to do much more of it. Well, I should have known I was wrong. Of course I did. I learned different techniques (I’m still learning, they aren’t coming out quite as planned yet) where you can use smaller amounts of clay and end up with a couple of pieces, not a whole drawer full.

A pair of earrings. on a brown marbled background are white cala lilies and green and gold leaves

©Giliell, all rights reserved

A pair of earrings. green and old leaves on a brown marbled background.

©Giliell, all rights reserved

Oval earrings, blended yellow purple and blue, with abalone shells.

©Giliell, all rights reserved

U shaped earrings in blue, yellow and purple

©Giliell, all rights reserved

The last two pairs are a bit too bright for my taste, but the kid already stole some, so I guess they came out alright.

Small colourful studs

©Giliell, all rights reserved

The good thing about having may hobbies is that I have many tools, so I used my silicone moulds for the scraps. While I love my big earrings, my ears occasionally appreciate small studs.

Drop shaped earings. white pieces with blue lines

©Giliell, all rights reserved

This is another technique where you cover the clay pieces in mica powder. Again, I’m happily stocked in that particular area and I really like the results. Now to my favourite pieces from that collection:

Round blue and white earrings with a dragonfly charm

©Giliell, all rights reserved

I’m just in love with them. The charms (again, yay for having tons of craft supplies) work just perfect.

The next pieces are from the same batch, only that I had to roll the clay more thinly and it turned into a whole different affair:

Moon shaped earrings, white and blue

©Giliell, all rights reserved

varios small studs in white and blue

©Giliell, all rights reserved

The effect became more like marble, with the colours blending more. Again, lots of nice, light studs. I think I could do with a second pair of ears.

Some good news: Self ID is coming to Germany!

I’m not going to waste many words on the shortcomings of our current government. Sometimes you could think the libertarians had won and absolute majority and weren’t just the most junior of the three partners, but while their youth is turning more and more pro fascist, the current leaders still have some classic liberal values.

Ages ago, our constitutional court declared the “Transsexuellengesetz” (transsexuals law) of 1981 to be unconstitutional some while ago, because it’s frankly menschenverachtend (that’s a German word you need : despising humans and humanity. Stronger than inhumane), but the ruling conservatives had blocked any sensible attempts to reform it, so up to this date trans people still needed to have their actual gender validated by psychiatrists, who got to poke their nose into people’s most intimate things like masturbation habits. Yes, if you’re wondering what that tells you about somebody being trans or not, you’re not alone. And trans people had to pay out of pocket for that particular privilege.

The proposed new process is as easy and streamlined as I believe it to be possible for Germany: You go to the registry office, declare your gender, pay a small fee, have it changed. This can only be done once a year.

Of course, transphobes are frothing at their mouths, wailing about how men will now just enter the women’s sauna. Somebody smartly pointed out on Twitter, why that is nonsense. Let’s take our hypothetical cis male pervert who wants to spy on the ladies in the women’s sauna. He goes to the registry office to change his gender. Congratulations, she’s female now. Her name changes and all her official documents. Her employer is informed, if she’s married, so is her spouse, her health insurance is informed, every doctor she visits has her listed as female. Only when she comes to the sauna, the owners tell her to fuck off, it’s a private business. So she sues the sauna. She spends a lot of money on this, probably raising a lot of media attention, all the time being gendered female. Does that sound a realistic scenario for some cis dude who wants to harass women? I mean, there’s enough mixed saunas around.

Let’s say she wins in court and the sauna has to let her use the women’s sauna. Does he now get to harass the ladies there? No, because harassing people is illegal for women, too. Something many terves don’t seem to understand, since they spend so much time doing it.

Big Gay Sword

I have featured michaelcthulhu several times already, and he keeps proving that he is a wholesome and good person.

The summary quote from this video:
“I don’t pretend to understand God or being gay. But only one side is sending death threats to a 22-year old so I’m pretty sure how I feel in this situation.”

Mike is trying to mad science how to make various patina colors on his sword in this one. I feel like I could have saved him a lot of trouble with that.

Tram Depo Graffiti – Part 5

I still have some pretty pictures from that depo, this is not the last post with them. And I did not accidentally publish twice the same picture – two of the graffitis were very similar.

© Charly, all rights reserved. Click for full size.

© Charly, all rights reserved. Click for full size.

© Charly, all rights reserved. Click for full size.

Another Wooden Mystery

In one of the sacks were these two pieces.

© Charly, all rights reserved. Click for full size.

I cut off the two ridges and I run all four sides along the table saw blade to clean them and I got two pieces 45x35x250 mm. One of them has a slight crack, but it is in a position where I would probably cut it anyway so not a big deal. This is enough for 4-6 knives, more if used as scales for smaller knives.

© Charly, all rights reserved. Click for full size.

© Charly, all rights reserved. Click for full size.

© Charly, all rights reserved. Click for full size.

© Charly, all rights reserved. Click for full size.

I am reasonably certain this is coconut palm wood. I worked with it before and Giliell has the resulting knife.

What is puzzling are the darker and lighter parts. Those are not sapwood and heartwood, palms do not have those, and anyway, I know of no tree where the outer sapwood is darker than the inner heartwood as would be suggested by the curvature here. I do not know what caused that color contrast, maybe it was cut close to the outer layer of the trunk, maybe it is decay, I have no clue. Palm trees do not grow around here so I have no knowledge about their variability and specific properties and no way to obtain said knowledge (google does not help).

It is not an extremely expensive wood but two pieces like this would cost me somewhere in the vicinity of at least 40,-€ plus shipping, so it is nothing to sneeze at either. These were, alas, the last surprise in my firewood treasure trove, the remaining sacks were all pure jatoba. Still, I can’t complain.