Lets Get Ready to Tumbleee!

I hope this will work. If not, I am determined to fiddle with it until it works.

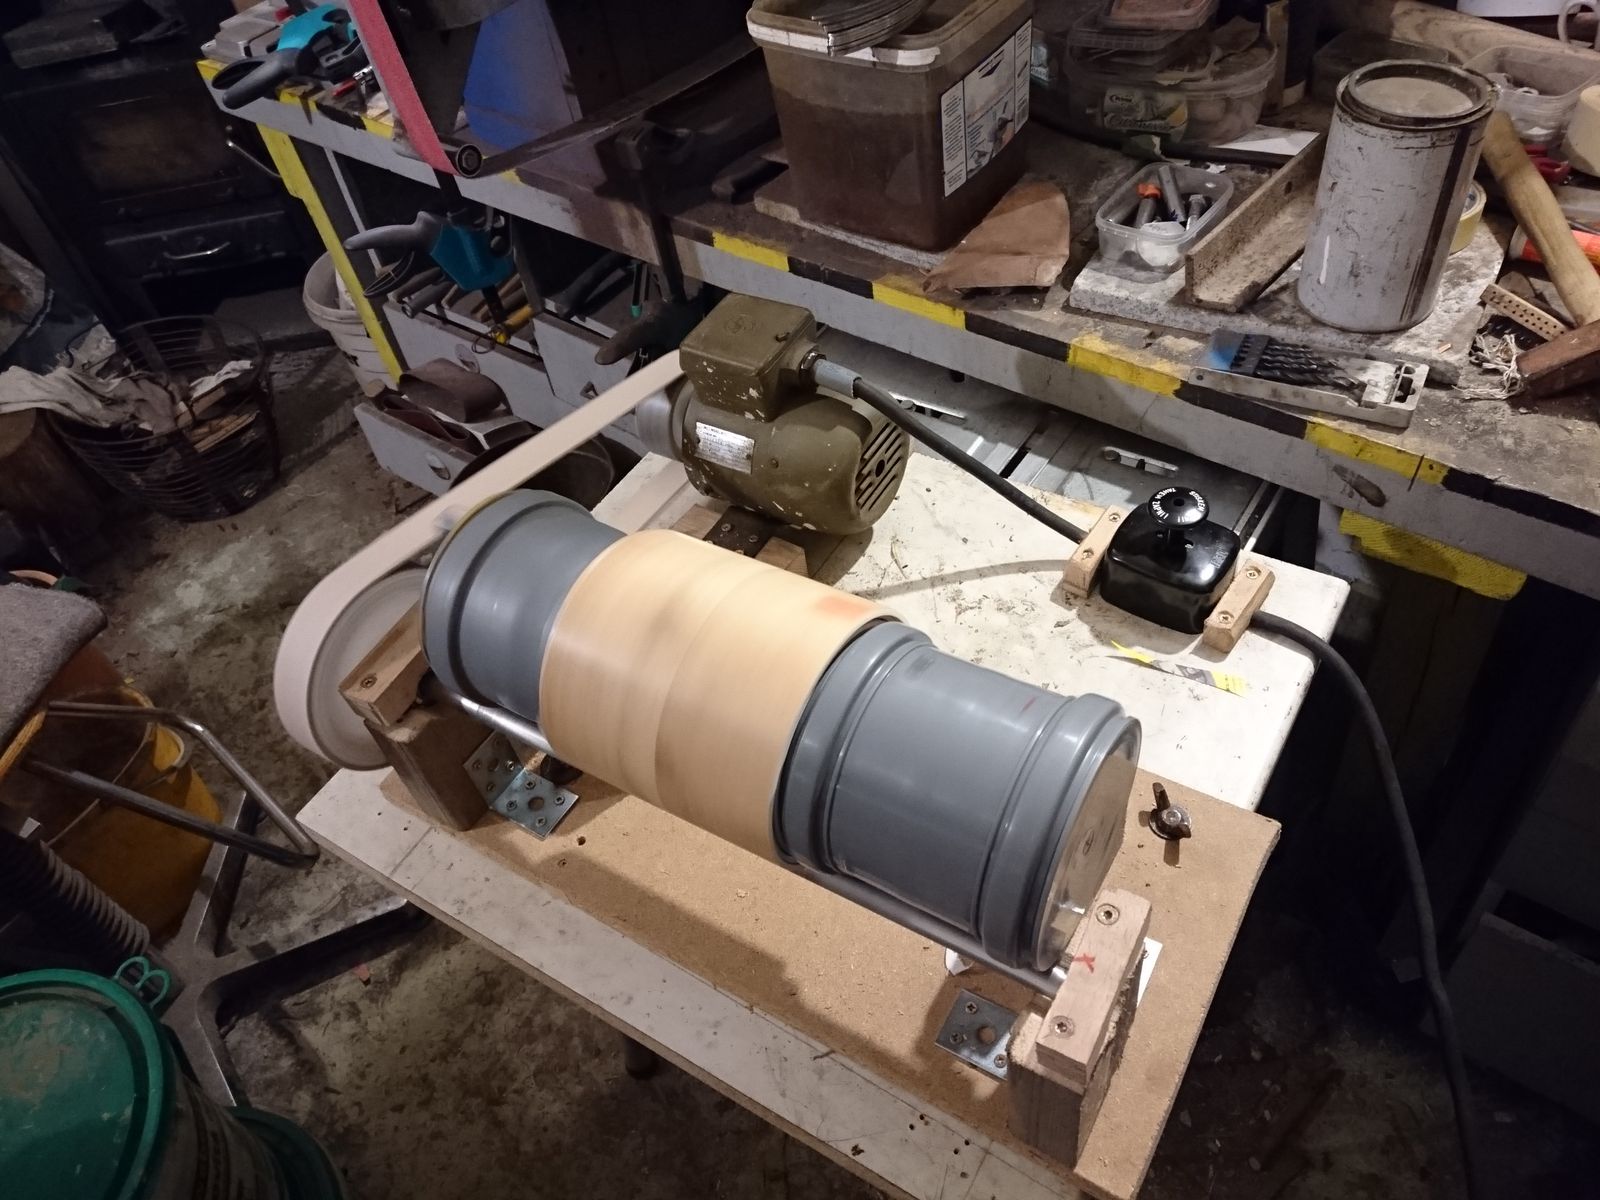
I found an old asynchronous motor in our cellar. It is a small thing, mere 140 W, and it lacked wiring, any elements to fix it to something and cam wheel completely with wedge. But I have managed to convince my father to connect a cable and a switch to it, and it was working. So last few weeks, whenever I have got an hour or two, I was building a tumbler. I did not document the building process, because there is not much to it, really.

©Charly, all rights reserved. Click for full size.

Just like with my belt grinder, I started with a particle board leftover from kitchen renovations, which was the base for my old drill press. It is a nice >2 cm thick board, covered with waterproof plastic on the upper side. Stable, strong, simply ideal as a base for a machine. Because the motor lacked any flanges or wings or whatevers to fix it and only had 4 M5 threaded holes, I took two pieces of steel that had 90° angle, straightened them to about 120°C angle and screwed them onto the motor. This provided me with two ears, that could be screwed on wooden blocks connected to the base plate. The switch was attached to the plate by its standard holes, plus two wooden pieces to better secure the cable.

©Charly, all rights reserved. Click for full size.

As I mentioned, the motor lacked cam wheel. So I stood in front of a choice – to buy V-belt cam wheels and V-belts, or try something else. I tried something else, because I deemed it easier and cheaper. I bought two PP furniture wheels of different sizes. One got attached onto the motor in the standard way – with a steel wedge ground from a piece of spring steel and a lot of cursing. The diameter of the axis was slightly smaller than the inner diameter of the wheel, but I was able to fill the space with a piece of steel pipe. For the bigger wheel I had more luck – it had inner diameter 15 mm. So I could just buy a 15 mm steel pipe and further I could put to use two old ball bearings that also had 15 mm inner diameter. With a bit of banging and a lot more cursing I was able to fix the two ball bearings and the big PP wheel onto the pipe (the PP wheel is further fixed with a nail, so it dos not hold on only by friction). Next step was to fix the ball bearings on two wooden blocks onto a separate particle board plate.

At this stage I also took a strip of leftover flooring PVC and glued it onto the PP wheels for better traction. It is actually nearly impossible to glue anything on PP with reasonable strength, but there are adhesives on the market that manage this task strong enough for this kind of application (I think). If it goes pear-shaped, I can always screw it on later.

For the tumbling drum I took a 100 mm diameter PP pipe and again I glued on it a few layers of PVC for better traction. The PVC lays directly on the steel pipe in order to reduce the fast rotations of the motor as much as I can.

Two small furniture wheels aid in keeping the tumbling drum in place whilst allowing it to freely spin. The tumbler thus lies between the axis and the two wheels and holds in place purely by its own weight.

©Charly, all rights reserved. Click for full size.

Last week I cut a piece of thick leather 1 m long, 3 cm wide, and I cut the ends at an angle so they overlap whilst the overall thickness remains the same, and I glued it together with epoxy. Hide glue would probably be better, but the weather was way too cold for messing about with hide glue. Today I took last few hours in adjusting the positions of the two wooden plates against each other to have adequate tension on the belt without it wandering in one direction or the other. As of now, it has been running for an hour without problems.

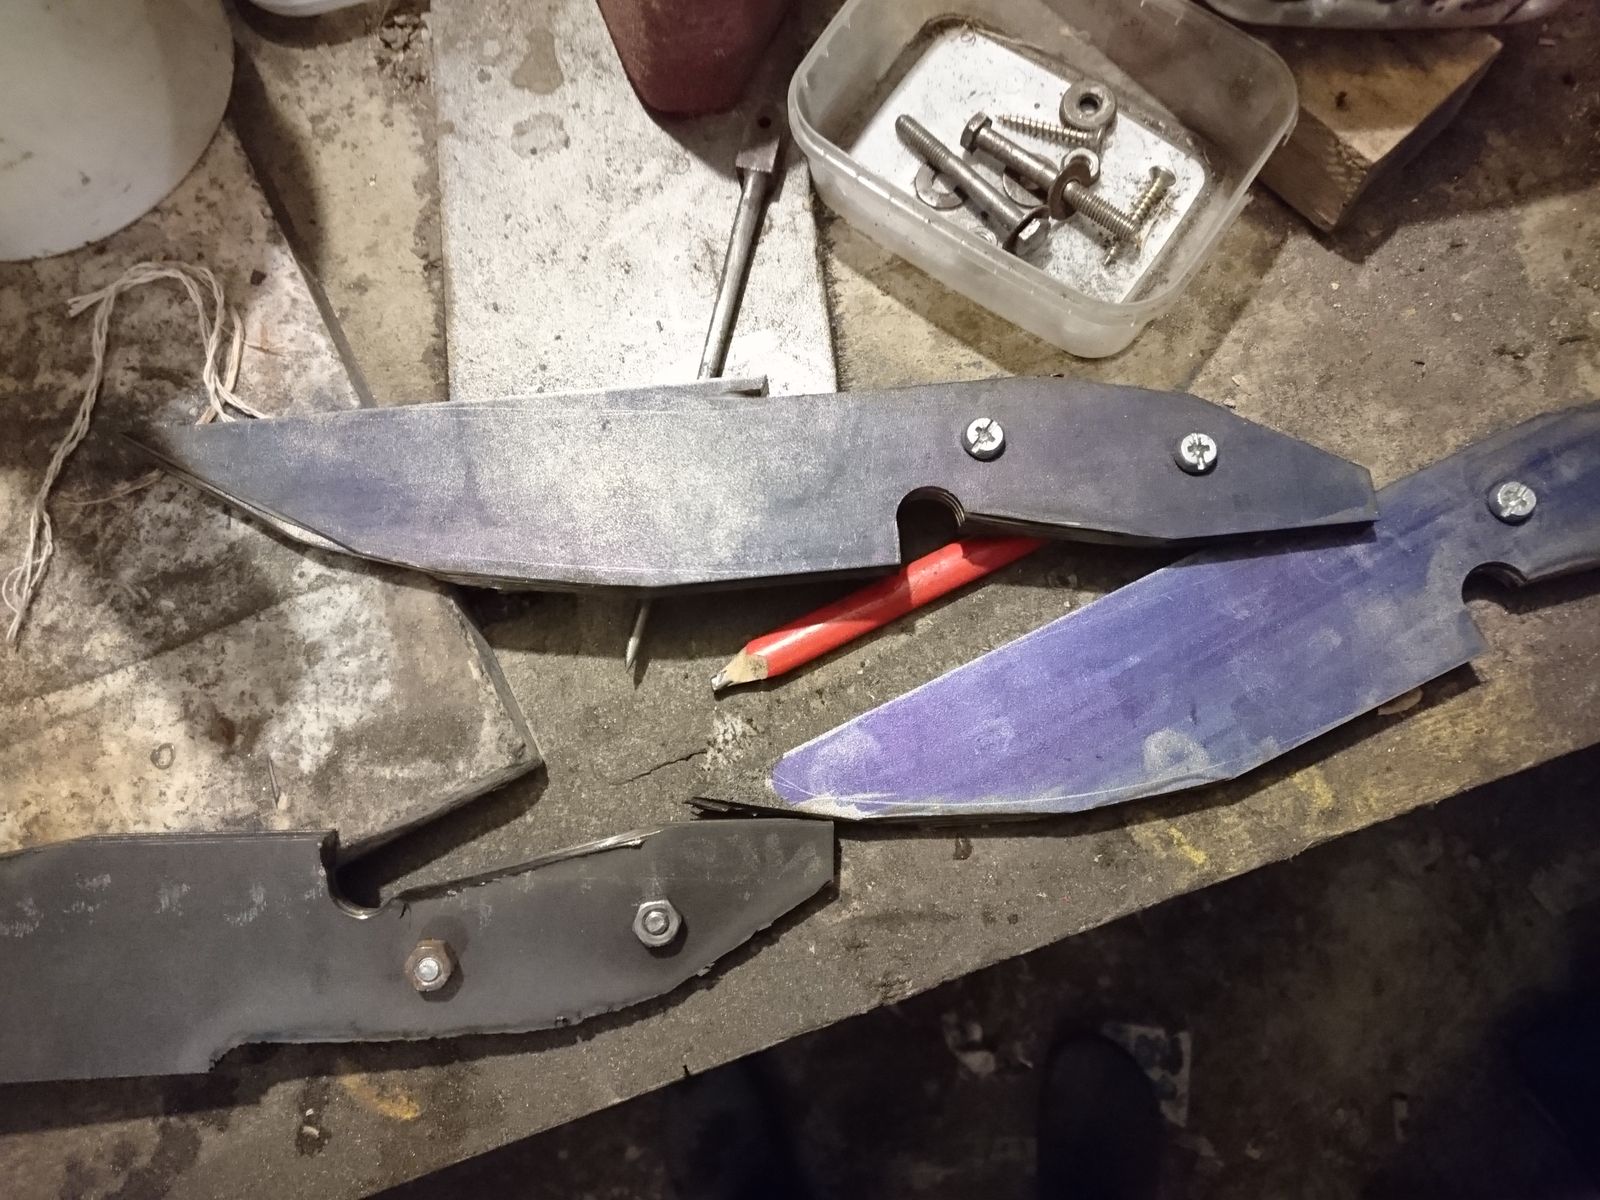
It has about 120 rotations  per minute, which might be a bit too fast. I put in shredded walnut shells, a soft coarse polishing compound and a broken blade from my failed machete build.

We will see what comes of it.

Tummy Monday Flowers, or something, on Tuesday.

I’m sorry for missing all the regular posts, but on top of the regular holiday business, my cold came back with a vengeance.

But the cold seems to be on the way out (I hope it cannot read this. Last time I said something like that, I wanted to die the next day…), Christmas Eve is over (the big day in Germany) and from now it’s visiting relatives and having them cook.

So, first, have yourself a tree:

©Giliell, all rights reserved

Every year, people decorate trees ion the woods. We wanted to do so as well, I even bought ornaments, but sadly it was either always raining or I was sick. But we went for a short walk yesterday and brought birdseed and nuts to the birds in the woods.

As I said, the next days are for visiting relatives. A few years ago we decided that since we couldn’t visit anybody on Christmas Eve without other people being offended and feeling less loved and what have you not (because being 60+ does not mean handling your emotions like an adult), we wouldn’t leave the house and nobody was allowed to visit and that really, really improved our Christmas time dramatically.

On Christmas Day, Mr’s family visits each other. Each year, one of the siblings hosts the whole family. This year it’s my favourite aunt in law. I promised a cake.

cake

©Giliell, all rights reserved.

That’s espresso infused chocolate cake. The first filling is vanilla and espresso buttercream and caramelised walnuts.

The second filling is buttercream once more with oranges that have been marinated in spiced rum and white wine for about two weeks. I also used that syrup to moisten the cake. On top there#s more oranges, some fresh, some marinated, and a few pomegranate seeds. That took most of my time yesterday morning.

Now for gifts. Charly has lamented the obligatory nature on Christmas gifts, and I fully share that sentiment. I love making gifts and I enjoy giving just as much as receiving. I don’t need Christmas for that. Nevertheless, there’s going to be a lot of resin jewellery this year, which gets me to the fuck annoying things. I’m going to give jewellery to all the ladies present today. That includes my mum in law. Who will politely thank me, but never wear it, but who would be very upset and hurt if I didn’t give her something she doesn’t like anyway, because see above.

©Giliell, all rights reserved.

Anyway, here’s all the gifts for friends and family.

I hope I’ll have time and muse for some better shots of certain things between the years, I really need to post an update.

And last but not least, temperatures dropped to December levels over night and I was greeted with ice flowers at the window.

Ice flowers

©Giliell, all rights reserved.

Ice Flowers

©Giliell, all rights reserved.

I hope you all get some rest, a time to breathe, and good food and time with your friends and family.


The Heart of Caine

Yesterday on his blog Stderr, Marcus wrote about the creation of a very special heart in a post titled  Un-Achable, Un-breakable. This is the rest of the story, told by kestrel who used her artistry to create a unique and meaningful braiding for the heart.


Marcus sent me this amazing Damascus steel heart that he had made as a gift for Someone Special, and he asked me to put some leather braiding on it. I was happy to comply and decided a key fob would be good to braid on there. 

©kestrel, all rights reserved

[Read more…]

Metal Magic – part 5

Kestrel finally reveals her finished piece of jewelery and it’s drop dead gorgeous. Before the unveiling, though, there’s still more work to do.

I’ve come a long way with this piece of metal and now it is finally even and thin enough that I can make a piece of jewelry out of it. So let’s get started. 

I’m going to use a nylon mallet for shaping. Here’s the beginning: 

©kestrel, all rights reserved

[Read more…]

Metal Magic – part 3

The next installment of kestrel’s magic making is here and there are tools to ogle.


It’s time to meet some of my favorite tools, the raising hammer and the planishing hammer. The faces on them are different shapes and that helps to shape the metal in different ways. The first one I’m going to use is the one on the left, the raising hammer. 

©kestrel, all rights reserved

[Read more…]

Light Magic

It’s an open secret that LED fairy lights were invented for me. I love lights and there’s an abundance of solar powered lights around the house in summer and (rechargeable) battery lights in winter inside. So to combine resin and lights was a natural step. Especially since Marcus sent me a crystal mould and a handmade big globe mould.

I first tried my regular resin with the crystal. I absolutely love how the colour came out and how the copper metal foil really makes it all mysterious.

©Giliell, all rights reserved

But, but, the resin clearly wasn’t the right one for such a project. It cured too quickly and with too much heat. You can see the bubbles all around.

resin crystal

©Giliell, all rights reserved

So back to the computer to get a different resin. This one cures a lot more slowly and with less heat and is more suitable for bigger projects.

resin crystal

©Giliell, all rights reserved

This one cured nicely without too many bubbles, though the longer time meant that my metal sunk down more than I like it. The opaque sheen is due to the acrylic paint I added for the colour.

resin crystal

©Giliell, all rights reserved

I used one of the solar fairy lights Marcus sent in this project.

Now on to the big globe. I first ran a trial freezing water and then deemed it suitable.

resin globe

©Giliell, all rights reserved

The mould is not quite perfect with some bubbles at the top, but with such a project you won’t notice that anyway. This time, my metal rose to the top and there are still some bubbles, but I think they add to the otherworldly flair.

But man does that resin eat itself. I swear the mould was filled completely. It#s not a problem here, since a perfect globe wouldn’t rest nicely on my window sill, but I think it would be best to refill part of it after a day or so.

resin globe

©Giliell, all rights reserved

Metal Magic

We’ve received a wonderful surprise from kestrel. She’s making magic and has decided to let us watch the show. This is part 1 of what may be about 5 parts and I am just as in the dark as you about what’s coming next. Kestrel will reveal all one post at a time so make sure to tune in for all the updates. That’s just the way magic should be, full of anticipation and surprises. And now… heeere’s kestrel!

A while back, Marcus posted about some mokume gane he had made, and the exciting adventures he had making it. https://proxy.freethought.online/stderr/2018/03/27/mokume-gane/ I know it’s properly called mokume gane, but I like to think of it as MarcusMetal. (No doubt that will trademarked soon.) Much to my surprise, it arrived at my house early one morning. I immediately leaped up to polish part of it – away from the coffee, mind you – because I knew it was going to be very beautiful and I could not wait to see it. If you look carefully, you can see a pattern of swirls of copper against the nickel in the part that I polished. When I am done and I finish a piece, I will put a patina on the metal that will make the pattern show up in greater contrast.

©kestrel, all rights reserved

[Read more…]

Transformation

Kestrel has finally shared some of her jewellery making with us and it’s phenomenal. What starts out as a pile of horsehair becomes ordered and ultimately beautiful at the hands of a master artisan. I’ll let kestrel explain the process…

I’m working on my website and one of the things that needs to be done is to re-shoot all the photos. Since most of my work is custom (in other words, people send me hair from their own horse, and then I make stuff out of it for them) I don’t have things in inventory, and that means I had to re-make all the items in order to take new photos. One of the things I like about my work is being able to transform my materials, whatever they may be but in this case a messy pile of hair, into something orderly and worth having. 

©kestrel, all rights reserved

Some of the braiding was done before it occurred to me to take a photo, but that messy pile of hair is going to be turned into 6 bracelets: 3 that are an 8-strand braid, and 3 that are a 25-strand braid, one each of white, chestnut and black. In case you are wondering: that messy pile of hair is made up of 1,761 individual hairs. That I had to count. On purpose. I don’t usually sit down and figure out things like that, because I just really don’t want to know; it’s a little depressing. But, if one is going to braid hair, one must first count it. 

©kestrel, all rights reserved

Part way finished, you can see the 3 8-strand bracelets are done and I’ve just started on the black 25-strand bracelet. 


©kestrel, all rights reserved

All done! It looks very different from how it started out. Now what I have to do is take good photos of each product so that hopefully, people will want one of these made from their own horse’s hair as a keepsake or memento. Just another day (OK, actually it was about two weeks) in the life of a braider. 

Thanks for sharing, kestrel. I’m astonished at the precision and beauty of the finished product. I can’t begin to imagine the amount of work involved, especially the counting! These are surely cherished keepsakes. Why, it’s enough to make me wish for a horse of my own.


10 out of 10 for First Impression.

©Charly, all rights reserved. Click for full size.

My new drill press arrived yesterday evening and I just installed it instead of the old cheapo one in my workshop. I must say that my first impression is absolutely great. I cannot definitively say whether it was a good investment or  not – ask me again in a few years, because new devices tend to have some crucial mechanical parts (like gears etc.) out of plastic that wears out rather quickly and subsequently the whole machine has to be tossed – but on the surface the machine looks really great. Someone has actually thought about the design and, a rare occurrence in today’s world, the design is very functional and sensible. Use is very intuitive and all levers and settings are easily accessible. I worry a bit that the wheel might be too small to provide adequate leverage for drilling steel, but we will see. That is the only worry I have on first sight though.

The drill has a digital display that actually shows the rpm, which is very nifty – I will not have to guess by the sound. It has two main gearing settings and a continuous rpm regulator, so it covers very wide range of rpm on a nearly continuous scale without me having to flip v-belts. That is probably at the cost of some efficiency, but the max power (710 W) is higher than on other drill presses that I could choose from, so that might not be a problem for actual use, although it might be a problem regarding power consumption. But it is not a device that will  run more than a few minutes at a time, so slight inefficiency is not as big of a deal as it woudl be for, say, bench belt sander.

©Charly, all rights reserved. Click for full size.

As a knife maker I fell instantly in love with the quick-span/release chuck that is standard attachment. The chuck is simply ideal for holding down flat stock, something very obviously crucial for a knife maker.

And the laser cross! A LED light illuminating the worked area was just a final bonus on top of that. It was always a bugger to find and hit the tiny black dot on black piece of steel – now those troubles are, hopefully, over.

And of course it does not wobble in all directions so I hope I need not fear anymore drilling tiny holes and breaking two drill bits per each.

All in all right now I have no regrets for spending the non-trivial amount of money for it. I think it is money sensibly spent and I look forward to trying it out as soon as possible. I might indeed regret a bit not spending that money sooner.

Making Kitchen Knives – Part 9 – Starting Again

As I said last time, I am going to make multiple knives in parallel, because I think that a non-trivial amount of time can be saved just by that. I had all my steel already straightened, so I could go right away to drawing, drilling and shaping. First thing to be done was to draw and drill one blade on one half of one steel bar. That I have subsequently used as a template to drill holes in the other half and in all the other steel bars.

©Charly, all rights reserved. Click for full size.

For the drilling I clamped the template firmly with the drilled steel bars and before proceeding to the other side I inserted a steel pin in the drilled hole so the bars do not shift and slide. This has saved some time, despite it being a step with negligible time in the analysis, but my main hope here is that this work on multiple pieces in parallel brings better reproducibility regarding the hole positions and and that better reproducibility could save me some time later on when shaping the handle scales.

I have learned two lessons, one of them rather expensive. First lesson was that for this I have to take the 6 mm drill bits as de-facto consumable material, because I blunted and subsequently broke one towards the end despite using copious amounts of cutting oil. And I do not think it can be avoided.

Second lesson was that I really have to buy a new drill press, and preferably one with continuously regulated speed at that. My jury-rigged press with a very old hand drill has only two speeds and both of them are apparently too high for drilling 16 mm hole in 1,8 mm steel. Towards the end of the work the step drill bit overheated and it got irreversibly blunted on the 16 mm step. Ouch. That drill bit costs 40,-€. I think this investment is unavoidable, if I want to save time I cannot take the bit out and dunk it in water after each drilled hole, slower rotations would be better. And I cannot buy 40,-€ drill bit for each dozen of knives I make – that money be best saved for grinding belts. Hobby or not, at this rate I would spend the price of an acceptable small to middle sized drill press (300-400,-€) on the drill bits rather quickly.

Cutting the blanks in half and roughly cutting the outlines of the blades with an angle grinder did not take long at all. and working on multiple blades in parallel seemed to work comparatively well. But for the sake of precision, next time I will halve the blanks individually – two came out somehow too short and two too long. Not by much, but it is noticeable. The end result were three stacks of four roughly cut blades.

©Charly, all rights reserved. Click for full size.

Before this step took me 15 minutes per blade, now it was 10 minutes per blade (teasing out broken 6mm drill bit and fruitlessly trying to drill a hole with blunted 16mm drill bit included). So I would call it a semi-success. I learned some do’s and dont’s and I achieved my two goals – the holes in the tangs align across all 12 blades nicely and I have saved some time without even really trying to.

Youtube Video: Medieval ASSASSIN’S CROSSBOW (Balestrino) ASSEMBLED & TESTED!

I could not decide between multiple videos, as usual, and last-minute decision fell on this one. It is a nice piece of engineering and the video is reasonably short and packed with interesting information.

It might also be Halloween appropriate? I have no clue, since I originate from and live in a country with no Halloween tradition whatsoever and honestly I do not understand what Halloween is supposed to be about at all. But I read something about murderers and monsters the other day, so maybe an (alleged) assasin’s weapon might fit in.

I have a day off and I planned to do some knife-work, but I have to pass on that since I am still not well.