
George Du Maurier. Trilby. Bindings designed by Margaret Armstrong. New York, Harper & Bros., 1894
via: This Ivy House
The book is available to read at The Internet Archive
George Du Maurier. Trilby. Bindings designed by Margaret Armstrong. New York, Harper & Bros., 1894
via: This Ivy House
The book is available to read at The Internet Archive

V is for Vermilion ©Nightjar, all rights reserved
Vermilion.
A brilliant red pigment originally obtained from the mercury-containing ore cinnabar. It usually has a slight orange tint to it, much like the petals of this Zinnia flower.

John Spargo. Socialist Readings for Children. New York, The Woman’s National Progressive League, 1909.
Look at how happy those children are. They have health care and will get a good education.
Photo via Pinterest
The book is available to read at The Internet Archive
From Nightjar,
U is for Ultramarine ©Nightjar, all rights reserved
Ultramarine.
A deep blue pigment obtained from lapis lazuli. Its name means “overseas” referring to its history as an expensive good imported by sea from Asia, but sometimes it can be found in the sea itself, I think.
Last time this part of the process gave me some grief and I also have expressed some skepticism with regard to how much time it takes me. Yesterday I have calculated that unless I get this time under 12 Minutes per blade, it is not worth doing from a financial point of view. So, how did I fare today?
I had 13 kitchen knives and 2 hunting/camping knives to for hardening. I wanted to harden one half in foil and one half with a new experimental protective coating, but I only got enough foil for five blades, so I used it for both hunting knives (those will be sold, so those were more important to not mess up) and three kitchen knives. The rest got the new experimental protective coating.
I started by properly preparing my workplace in order to not needlessly waste time. On the left, you see a can with oil, a water bucket, several pliers and the blades. On the right is my mini gas-forge on my circular saw table, which is metal and thus non-flammable. I had to work indoors, there was a threat of homeopathic rainfall.
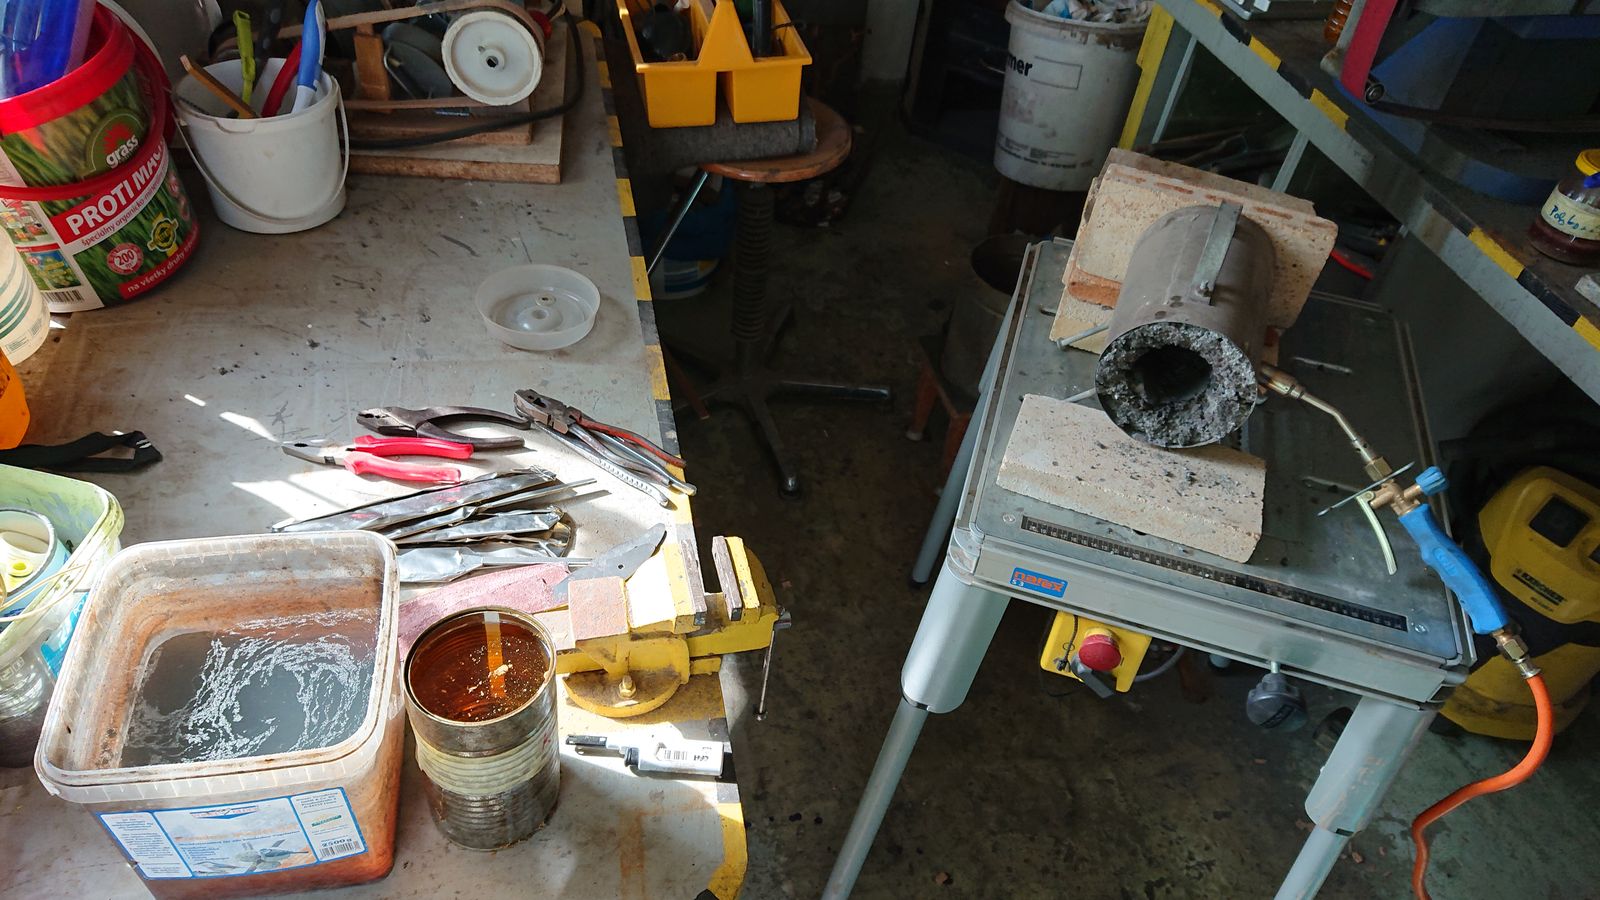
Prepared tools. © Charly, all rights reserved. Click for full size.
First I let the forge heat for fifteen minutes empty and then I started to put blades in it. In order to give the steel the soak time it needs (30 minutes), I started by putting in one blade every five minutes, always putting the last blade on the left side, pushing all the blades inserted before that to the right towards the burner. After half an hour I could quench the first blade and I continued with 6 blades in the fire at once.

Blades in the forge. © Charly, all rights reserved. Click for full size.
Unfortunately, just like last time, the temperature was a problem. I tried to insulate the forge a tiny bit better, but it just did not help, this burner is too small. I got over 950 °C, but that is still some 70°C short of the minimum for this steel. It got hardened alright, but probably not to the fullest potential. That I will not know until I have cleaned and tested the blades, and that will take a while. So far I only could take each blade and try if it scratches into a piece of unhardened steel – and they all did. (A side note to temperature measurement – I tried to look it up, and oxidized steel at this temperature has an emissivity around 0,9, so my IR thermometer should give accurate enough readings in default settings.)
I knew that my oil container is a bit small, so the oil will heat up way too much in due course, that is why I quenched the blades double – first in oil, then in water. That way I also extinguished any flaming oil clinging to the freshly quenched blade. It is a bit risky, but I did not hear the tell-tale cling of the cracking blade this time, so maybe I got away with it. We will see if some cracks show later on.
Hardening the blades in foil was a bugger. For the kitchen knives, I pulled them out of the foil before hardening, and they all warped in quench something awful. The camping knives got quenched still in the foil, and they surprisingly still got hardened rather well. Maybe the next step has helped? I do not know.
For the next step directly after quenching (after quenching all blades, which took me 2:25 or 145 minutes) I packed all pieces in plastic foil and gave them into our freezer at -20°C. Ideally, I would put them in liquid nitrogen to cryo-freeze them, but I do not have that kind of equipment to play with. So I looked at the internet and I found that in some steels of similar composition simple freezing below 0°C is enough, so I reasoned – it costs me no money and no time either, so on the off-chance that it does something I will do it. I have no way of measuring whether it helped or not, but it did no harm for sure.
After about two hours in the freezer, the blades got out of there and into the kitchen oven at 150°C for 1 hour.

Baking knives. © Charly, all rights reserved. Click for full size.
After that, I left them cool down to room temperature and when they cooled off and lay for one hour at RT, I tried to fix the warpage on the three kitchen blades by clamping them between a few pieces of steel before the second tempering, which was again one hour at 150°C.

Baked knives. © Charly, all rights reserved. Click for full size.
It did not help, the edges remained warped. So I clamped them again and tomorrow these three blades go into the oven again, this time at 200°C for one hour. That means they will be less hard still, but hopefully they get a bit straighter.
If not, then what I have here is a case of “knifemakers do not make mistakes, they make smaller knives”. The mistake that I did not make this time has, in my opinion, nothing to do with the use of protective foil, it was in my opinion just a coincidence that all foil-wrapped knives warped. I think I have simply ground these blades too thin – remember how I complained about my abysmal skill with the belt grinder?
At least I had no banana-bending to one side, which means that my grinds were symmetrical.
The protective coating actually did dissolve significantly in hot water this time, so I think that I am on the right track there.
And what was the time? All in all, with packing some blades in foil and coating some with badly prepared mixture whilst chatting with my brother and my sister in law, and preparing and cleaning away the whole workplace, it took me about 15 minutes per blade. That is an excellent result. 75% improvement compared to the last time. I think with a few more tweaks I can actually really get this to the 11 minutes per blade that I need. I am not there yet, but I think it is possible.
The next part is the polishing. The biggest time-eater and finger-breaker of them all.

The Golden Fleece: A Romance. Julian Hawthorne. Philadelphia: J. B. Lippincott Company, 1896. Illustrations by C. H. Stephens. First edition.
via: Books and Art
The book is available to read at The Internet Archive
From Nightjar,

T is for Teal ©Nightjar, all rights reserved
Teal.
I’ve noticed that some of my succulent plants display a teal hue that almost glows under certain light conditions. I tried to capture that here, although this one required a bit of post-production to bring it closer to what I had in mind. I still liked the result.
Some pretty-in-pink winter flowers from Australia courtesy of Lofty.
Although its midwinter here there are still plenty of bright little things to see on the non rainy days. These little flowers are around 1/2″ or 12mm long and were trying to hide in a dark corner, but a sunbeam surprised them. Described here: https://en.wikipedia.org/wiki/Epacris_impressa

Epcaris Impressa ©Lofty, all rights reserved

Edith Ogden Harrison. The Moon Princess. Illustrations by Lucy Fitch Perkins. Chicago, A.C. McClung & Co., 1905
From Nightjar,

S is for Salmon ©Nightjar, all rights reserved
Salmon.
Birds can be salmon too, as shown by this salmon-colored canary.
Link to previous alphabet post.
I am sorry it took me so long to actually begin with this since several of you said you’d like to read it, but I feel like I am chasing my tail most of the time this year. It is very frustrating, being behind schedule on absolutely all fronts all the time…
I am not going to try and persuade anyone about anything, but in my opinion, if someone considers having a bonsai tree, they should have good reasons to actually do so successfully, and they must meet some criteria too.
Some of the good reasons are if you like growing things, whether in the garden or in pots doesn’t matter, and you want to try something new. Another good reason is if you are interested in studying Japanese culture and you see caring for a bonsai tree as a way to try and to get a more personal feel for it. Or you just think bonsai are cool and you would like to have one (that was my reason for starting).
Some of the bad reasons might on the surface look very similar to the good ones, I am not going to list those, however. Just a note – New Age is crap.
But whatever your reasons, the main underlying requirement on you as a person, if you want to have a bonsai tree, is liking nature and plants. Another is not minding to get your hands really dirty from time to time. The third one is patience. Lots of it. And lastly, you must be prepared to cope with loss and disappointment. Some trees will just die randomly.

Cupressus sp. In memory of a tree that got killed by unpredictably fast changes in weather. © Charly, all rights reserved. Click for full size.
What is my reasoning for this? Having a bonsai tree means committing yourself to take years or even decades-long care for a living organism with its own needs and unique properties. Good reasons are in my opinion those that would be favorable towards such commitment, bad are those that would undermine it. And being really interested in something is not the same as being infatuated with the latest fad.
Enough of pseudo-philosophical babble though, for introducing this suffices. In this series, I will concentrate first on some basic aspects of bonsai care – what tools to use and where to get them, what are your space requirements, etc. Then I will list several species that are well suited for beginners in various environments, species that are more challenging and also species that a beginner should avoid like a plague. I will occasionally also write detailed articles about how to actually care for several of those species in order to have a prosperous and beautiful bonsai.
So, stay tuned, I will post on weekends whenever I find the time.
A few Fridays back I posted photos from Avalus of some pretty cool fungi with the title of It’s Fungi Friday. Well, I’m pleased to say that for the next little while Fungi Friday is going to be a thing. Opus has sent in some sensational portraits of fungi and they’re going to roll out on Fridays because Fungi Friday sounds way better than Fungi Monday or Tuesday.
Here’s Opus’ first wonder-filled photo.

Blooming Moss, ©Opus, all rights reserved

William Wesley Cook, A.M., M.D. Practical Lessons in Hypnotism. Chicago, Charles Thompson Co., 1901
You’re getting sleepy, very sleepy…
via: Quicker Than the Eye
The book is available to read at The Internet Archive