Project Badgermascus – Part 9 – Almost Done

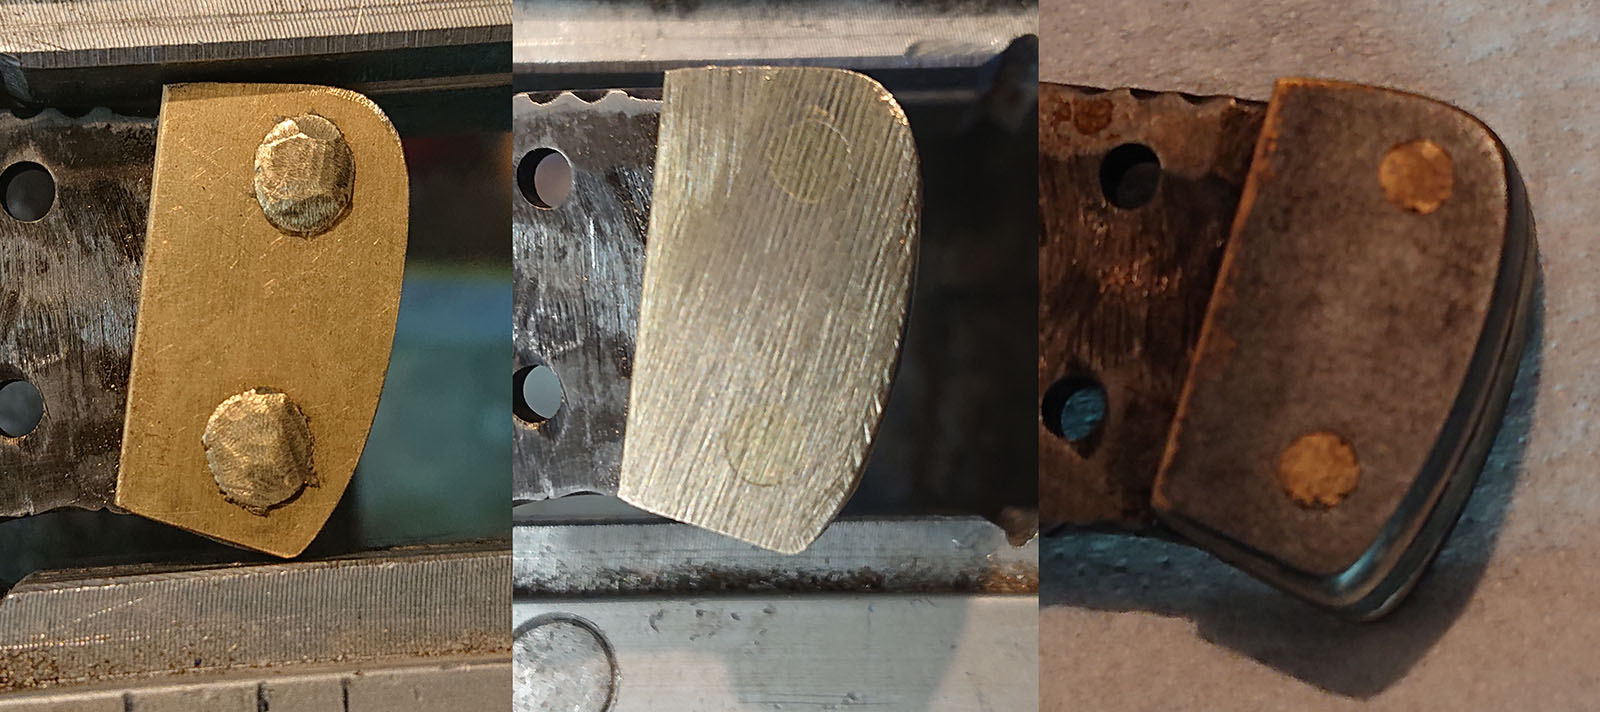
The knife is done about 95% now. I have peened and ground flush all the pins on scales without some major failure, although there did appear one tiny crack near one of the pins ‘sigh’. I have sealed the crack with super glue and sanded it over, there is nothing else that can be done about it.

I did not do a very good job at the pins, I must say. I think the mistake that I make is leaving myself way too much material to move, which leads to a lot of problems later on. I must remember that for 3 mm pin it is quite enough to peen less than 1 mm material into a recess just 0,5 mm deep. It is not as if the pins need to hold extra-strongly.

But, it is done and it is what it is. I applied a little bit of patina to the pins. Not to make them black, just to make them ever so slightly aged. Funnily enough, the patina has highlighted some of the imperfections – and that made the whole assembly to look actually better. Only you must forgive me for now for not revealing the whole knife yet. There is still a lot of work to do before I consider it publication-worthy, do not expect that very soon.

© Charly, all rights reserved. Click for full size.

I am thinking now how to best seal the surfaces and the patina. Either beeswax, or drying oil. Or both. Any suggestions? I have zero experience with patina on metal jewelry, which essentialy is what this is.

The Art of Book Design: The Latch Key of my Bookhouse

Olive Beaupre Miller, ed. Various authors and illustrators. The Latch key of My Bookhouse. Chicago, The Bookhouse for Children, 1922.

This is a curious book about the origin of shared stories and fairy tales. I found the most exciting part of the book to be its several indexes. Located at the end of the book, they are organized by author, character, historical era, geographical location and ethical themes, such as cleanliness, compassion, honesty, and faithfulness. Christian faithfulness that is. The book casually assumes a white, protestant readership, and the Values Index reads as a How-To book for raising quiet, compliant children who become hard-working, modest, reserved, compliant adults (living in a racist, xenophobic, patriarchal, misogynistic society) who don’t question authority. Bah! Teach your kids to question everything, to value learning new things and new perspectives, to seek equanimity and fairness, to speak with confidence, and to actively create a world that everyone wants to live in. A sampling of the illustrations is attached below the fold.

[Read more…]

Project Badgermascus – Part 8 – To Peen or Not to Peen…

Today was very stressful, although I did not, in fact, do too much work. But I was agitated about it so I procrastinated a lot, putting off each step for fear of mangling the work and losing a lot of progress. That will also be the case tomorrow.

Today was the day of gluing the scales to the tang. And because I wanted to peen the pins from the beginning, I also had to prepare for that.

For I lack proper ball-peen hammer for this kind of job. I have a wide variety of cross-peen hammers, but only one, big, ball-peen hammer. And that is way too big and chunky for 3 mm brass pins. They are not sold in any stone shop around here, and ordering one online would again put me in the age-old problem – is it worth buying something if the shipping costs more than the product?

So I have to make do with my smallest cross-peen hammer and a few thingamajigs that I have made myself to make the job easier and, hopefully, better.

© Charly, all rights reserved. Click for full size.

Peening pins in bone is kinda dangerous. Bone is hard, but not particularly strong and it can easily split. To try and reduce the risk of splitting I have therefore pre-peened one side of each pin before assembly, so the pins are shorter and thus less likely to bend when I am peening the other side. To make a better job of this I have taken a piece of mild steel from a failed attempt at burner diffuser and I drilled in it 3 mm hole, chamfered to about 5 mm recess on one side. Then I held the pins in a vice and peened one end into this recess.

The second tool that I have made is from an old hook-nail. It is very old and therefore good medium carbon steel, hardenable, although not to the highest degree, and very tough. If the tool works, I am going to carburize the surface and quench it.

© Charly, all rights reserved. Click for full size.

First I have cut off the hook and the tip. Then I have center-punched the center of the square where the tip used to be and dished it out first with a 3 mm bit and then 7 mm bit in a hand-held cordless drill. Then I put a big diameter ball burr for die-grinder into the drill and rounded the inside of the dish and I ground the edges round with a file. I have tried it and it seems to work well when used after the hammer for the final touches on the edges. So I hope to get nice round peened pins tomorrow.

With that done, I have also repaired one of the scales – two holes were a few tenths of a millimeter off so I could not put the pins comfortably through all holes. Not a big problem, I have filled the two holes with quick-curing epoxy mixed with bone dust and drilled them new. You would not notice there was a mistake there if I did not tell you about it.

Then I was ready for the job that I was putting off – the glue-up.

© Charly, all rights reserved. Click for full size.

I have used slow curing epoxy, with work-time 1,5 hours, instead of the 10-minute one that I have used previously for kitchen knives. The reason for this was not only to reduce stress and the possibility of a complete fuck-up, but also the fact that this simply could not be done quickly. Mixing the epoxy, slathering it over the tang and attaching the pins and the scales was simple enough, but after that came the difficult part – to clean all the squeezed-out epoxy from the fileworks. I have used first small pieces of kitchen towels soaked up in denatured alcohol to wipe out the biggest excesses and then a toothbrush soaked in the same to tease-out glue from al the nooks and crannies. I do hope I have made a good job because there is no way back now except either take it as it is or to drill out the pins, smash and grind out the bone and start with the handle scales all over again, which would not be fun at all.

Project Badgermascus – Part 7 – The Pinkening

For the next attempt at the patina, I had to think of a more fool-proof way to mask the areas of the assembly that are not allowed to come in contact with the chemical solution. I have used plastic packaging tape in the past, so I tried it this time. But the one I bought this time is extremely difficult to take off because the glue is too strong. That makes it also difficult to apply tightly around the blade since once it gets stuck, it cannot be corrected. And, the masking around the filework was a major headache-inducer, there the tape was totally insufficient.

So I needed something that is resistant to water and water-soluble chemicals both acidic and basic, hot and cold, something that will show me clearly what is masked and what is not, something that can be applied with high precision and good adhesion to complex surfaces and simultaneously can be removed easily later on without damaging the patina.

And after some thinking, I did come with a solution that worked really well. I made everything pink!

© Charly, all rights reserved. Click for full size.

That is the cheapest nail varnish that I have seen at the local drugstore (2,-€ per bottle). Afterward, I have added the packing tape on big surfaces, but I think it was unnecessary and just me being overcautious.

© Charly, all rights reserved. Click for full size.

I proceeded to make the patina on brass fittings by alternating between acid bath (HCl, very diluted) and polysulfate bath (with occasional brushing with a soft brush under running water) until I have received a color that I was content with, which is sort of metallic blue/brown/dark gray, very similar shade to the oak-tannin patina on steel.

Cleaning off the varnish was a bit of a hassle and used up a lot of paper towels and acetone, but the important bit is that it could be done, could be done well (it was easy to spot uncleaned places) and did not scratch the patina on either the fittings or the blade. I will probably buy heaps of cheap nail varnish, it opens up great possibilities.

TNET 40: The Power of the Pentatonic Scale

I find this video absolutely fascinating. I have no idea what a pentatonic scale is and how it differs from the other scales that are there out there. I tried to read up on it and, as it is usual with music, I comprehended none of it. And no, do not try and explain this to me, it is a waste of time (despite rq’s and consciousness razor’s best efforts in the past, I still have no clue what bar and meter are).

But even so, I was able to hum this melody along, I understood what the next tone in the scale should be on an instinctive level and that simple melody has proven to be a real earworm, I could not get rid of it for days.

Open thread, talk whatevers, just don’t be an a*hole about it.

Previous thread.

Project Badgermascus – Part 6 – Trials and Tribulations

I have spent both Monday and Tuesday finishing flattening, drilling, and fitting the handle scales and the brass fittings.

© Charly, all rights reserved. Click for full size.

First I have sieved some bone dust that I have collected through a fine nylon mesh (from pantyhose – I do not wear them, but they can be quite useful in the workshop, so I have indeed several in a drawer). I mixed then the bone dust with five-minute epoxy, filled the hollow back of the bones with it and heated it with a heat gun to about 70°C (not so hot you cannot touch it, but hot enough you cannot press your hand against it for a longer time, a hairdryer would suffice too for this particular task) for quicker curing and stronger bond.

After it completely hardened I ground the back flat again and proceeded to drill the holes for pins.

© Charly, all rights reserved. Click for full size.

Drilling the holes was relatively uneventful. Double-sided tape was very useful in holding the scale on the tang and the whole assembly on a flat piece of wood for drilling to avoid chipping of the bone on exit. Also, I have used blunted and overheated drill bits to hold the scales in place for a good fit and I did not mess up the job terribly. I did make minor mistakes on the left handle scale, but those should be correctable when fixing everything together.

With the scales drilled and fitted against the bolster, I proceeded to make the brass pommel fittings. That went really well, and everything went smoothly. Too smoothly you might say. I glued the brass fittings in place, peened the pins and ground, and polished them over.

That is where the problems started, and I must say – they are not all my fault.

The first problem was that the round stock I have used for pins apparently has different chemical composition than the flat profile used for fittings. Had I known this, I would not file them flush and I would leave them slightly proud of the surface (“admitted” instead of “hidden”). However, there was no way back once I ground them flush, so I was hoping they will get hidden under the patina.

But the patining did not go well too, in three ways.

© Charly, all rights reserved. Click for full size.

The first  – I have made a mistake – I have not masked the steel properly. I thought I did, but I just did not. And as one Czech rather rude but astute saying goes – ” myslet znamená hovno vědět” – “to think (assume/mean/guess) means to know shit-all”. So when I was giving the brass a nice hot bath to copper plate it, some of that bath leaked under the masking and copper-plated and etched the blade in some places too.

The second – the different brasses did not take copper plating identically, it was a lot more difficult to copper plate the pins than the rest. It took over an hour to do on the pins what took mere minutes on the rest (which exacerbated the problem with poor masking later on).

The third – when blackening, I have made the solution probably way too concentrated. It has covered the parts in a nice jet-black matt color almost instantly. But that color has completely rubbed off when I washed it with water and brush. I did not realize the true cause of this so I tried it two more times, but it just did not take, especially not on the pins, After the third attempt I thought I am done on the pommel at least, but it flaked off the next day again.

These mistakes are not catastrophic, but they are a major setback. I had to re-polish everything (done), re-etch with ferric chloride (done), give the steel new tannic-acid patina (in progress), and only after that is done to my satisfaction, can I again try to patina the brass.

However, I have to deal somehow with the pins now. They are ground flush already, but since they will not take the patina the same way the rest does, I must leave them visible. And that means probably leaving them polished and not applying patina to them at all. I will do that and then I will decide whether I like it or not. If not, then I will have to drill them out and either replace them or, if I bungle that job (which is very likely) to make completely new fittings. Either way, it is at least one day, and possibly several days, of work before I can progress further.

However, there did come one good thing out of this – I found two new recipes for black that do not require copper-plating the brass first. One requires hot-bath with ammonia (CuSO4+Na2CO3 – precipitates basic copper carbonate which after filtering and washing with water can be dissolved in hot water by adding ammonia), so it is a major stink and not exactly easy or quick. The second one works at room temperature but is rather caustic and dangerous to handle (HCl + potassium polysulfide). I will probably try the second one now, although I do not like very much working with caustic solutions, since my equipment, as you have seen, is not exactly suited for that kind of job.

Resin Art: there’s different roads to success, but infinite ways to fuck up

Remember the seashell resin bowl failure? Of course I didn’t want to leave it at that and made another one. This time I cast it in the early afternoon so I could form it in the late evening. Also the painter’s foil I’d used to pour it on was pretty matte, and I wanted shiny, so I used cling foil again. Well, only that the cling foil melted when I used the heat gun…

I could salvage the result and I actually do like it very much.

©Giliell, all rights reserved

©Giliell, all rights reserved

Only it’s got some gaps and slashes and you should be really careful when you handle it because resin can be sharp as a knife.

Next try: using a non stick baking sheet. That was definetely heat safe. But, you already know there’s a but, it was also quite rigid and didn’t fit the tray I use for pouring well, so the result became smaller and thicker than hoped for. Also they matte surface again.

©Giliell, all rights reserved

©Giliell, all rights reserved

©Giliell, all rights reserved

I had to glue some pebbles into the bottom because it’s asymmetrical, but the overall result is good.

OK, back to square one. Cling foil, no heat gun, just my lung capacity to blow the resin around. But also remember what I did wrong in square one? Right, pour at night, form in the morning. This time it didn’t tear, but it also didn’t move much. The result is so much off balance that I had to put a pound of pebbles into it and still the slightest wind couldmake it fall over

©Giliell, all rights reserved

And now for the last one, poured in the afternoon, no heat gun, on cling foil:

©Giliell, all rights reserved

©Giliell, all rights reserved

Here you can see how soft the resin still was and how easily it shaped. It is the tall, slender, wavy thing I’d been hoping for.