So, I texted my friend Kitten and said, “Hey, I made a spear. Do you want it?”
She replied, “Wait, are you, a white guy, asking me, a black woman, if I want a spear?” (pause) “Of course I do!”
I’m stupid about many things, when I get focused on a project and/or its outcome. The problem I have is the same as I had when I do any art: my house quickly fills up with output and I have to get rid of it or die in victorian clutter. I don’t want to end up in some police report as “apparently a shelf of swords fell on him.” Anyhow, that’s the real reason I periodically auction off a knife or a bowl or whatever. Actually, I don’t know the financial status of FTB right now, maybe I should check and see. But as it happened, I decided to throw down an “iklwa challenge” with Mike P, another bladesmith, and I’ve been finished with my entry for a while and his is still on the bench, 9 months later. I know he is doing some ambitious stuff but only vaguely.
The other name for an Iklwa is an “Assegai” – it’s the basic Zulu short spear. Chaka Zulu was credited for popularizing a short stabbing spear and shield combination and deploying his troops like somewhat-less-regimented Roman infantry. Mike and I had been going back and forth about the idea of doing gladii, but Iklwa seemed like a more reasonable starting point. (as the size of the work-piece goes up, the size of the smithy necessary to produce it goes up dramatically) in general you don’t really want to be smithing on something you can’t lift with your left hand, unless you have an assistant. But, of course, I wanted to make sure that any spear I made was tough enough to fight a Tesla Cybertruck and win. So I started designing.
From the beginning, I was thinking that it was going to be a heavy thing, as suitable for chopping as for stabbing. That was erroneous, of course, but deliberately so: a formation of spearmen with shields would not be chopping anything. In fact, period correct Iklwa are long and thin, sharp on the edges to aid penetration, but not heavy enough that chopping a panzer tank would get any notice from the crew. Mike and I had some fun discussions about that, concluding that (as usual) a lot of the construction and usage of blades was gated by the availability of good steel in low-tech conditions. The world history of warfare does this amazing technological change-over in the 1900s when steel becomes so cheap nobody hardly bothers even making iron anymore. I told Mike that what I was going to do was imagine a somewhat naive Japanese bladesmith encountering Zulus and attempting to make something they’d want. In the end (spoiler!) I made something probably a samurai would also find too heavy. I just can’t stand the idea of something I make breaking.
A lot of this metallurgy stuff is about figuring out how to put the right metal (the hard stuff that holds an edge) in the right place (the edge) and the other stuff where it’s supporting the edge. So, my idea was to make a billet of what I call “suminigashi” (water-texture paper) and some high carbon low-layer bars for the edges. The low-layer bars would be straight vertical grain and the suminigashi would be twisted and would show all kinds of cool interior action because some of the metals I layer in there are things like mild steel, which etch to a fetching soft white. Look, it’s a spear. It’s supposed to be dramatic, right?
The handle is also another problem. The traditional “most of the world” way of mounting a spear-point is with a socket, which, if you think about it, is a fairly small region of metal to take the shock of a Panzer IV. So I decided to go with a stick tang, like a Japanese Yari spear might have. That comes with problems of its own, namely that you’re using not so much wood up by the tip of the spear and you don’t want the tip to splinter sideways – this tends to drive the thickness of the shaft up. It also tends to make people like me think of using exotic hardwoods that are brutally heavy, or filling the wood with chopped fiberglass and epoxy. Because when you try to stab the tracks of that Panzer IV, you don’t want the handle to disintegrate before you do. So I hit upon the idea of a tightly fitted handle with lots of epoxy, and reinforcement rings to keep the sideways splintering problem to a minimum. We’ll get to that later.
So I laid up the billets, flattened them, clean ground them, and welded them into a mass about 7″ long by 4″ wide. Then I took an angle grinder and cut a deep “V” into the suminigashi about to the middle of the billet. Then it was back into the forge to draw out a tang, and then get it hot enough to weld shut the open front end of the billet and shape it into something spearish. I was a bit off with the V-cut since I eyeballed it, but the metal closed up OK, the tang got long (about 24″ of 1/2 x 1/2″ carbon steel near the point, and I had something that I was pretty sure would be noticeable if it was waved under someone’s nose in a threatening manner.
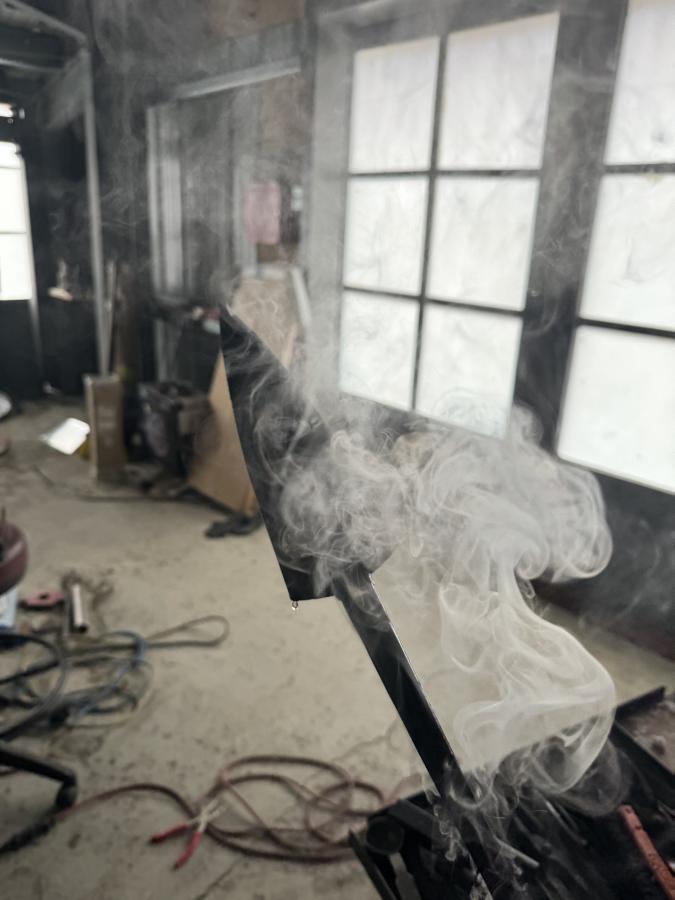
Then comes the process of cleaning and shaping and more cleaning and shaping and sanding and polishing and whatnot.
It was around somewhere in there that I realized that a big 6″ x 48″ woodworker’s belt sander could be equipped with a metal-cutting belt and could do a fine job of creating great big flat surfaces. Who wants great big flat surfaces!? Me! Me!
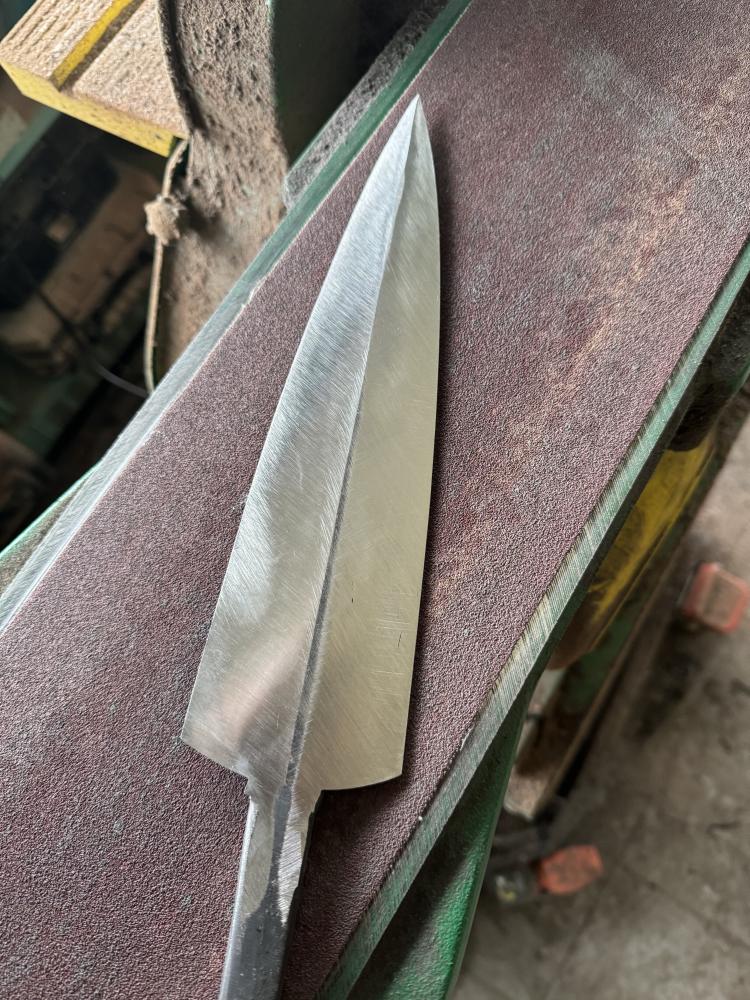
So here’s a test-etch on it before I started really getting into precision grinding.
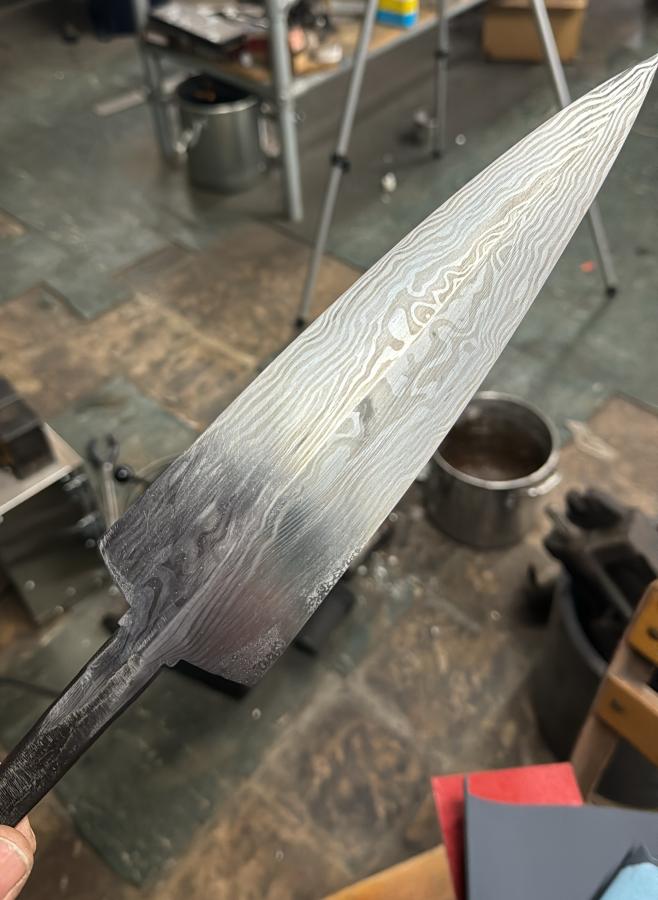
One of the purposes of a test etch like this is that the ferric chloride will get, and stay in, any crack or bad weld. In 2 days there will be a revealing rust-spot. Here you can see how the twisted suminigashi core is holding the vertical stacked edges. You can also see by the haft of the tang, how I drew the entire blade’s material down into the tang. What you can’t see is that, for extra strength, I also put a few twists into the tang before I squared it off. Realistically, I know I am joking about stabbing armored vehicles with this thing, but the metal ought to be damn tough. The cloudy regions in the suminigashi are mild steel, which is not prone to cracking under stress. Someday maybe I’ll make a bar and waste it to see what it can take but – not today.
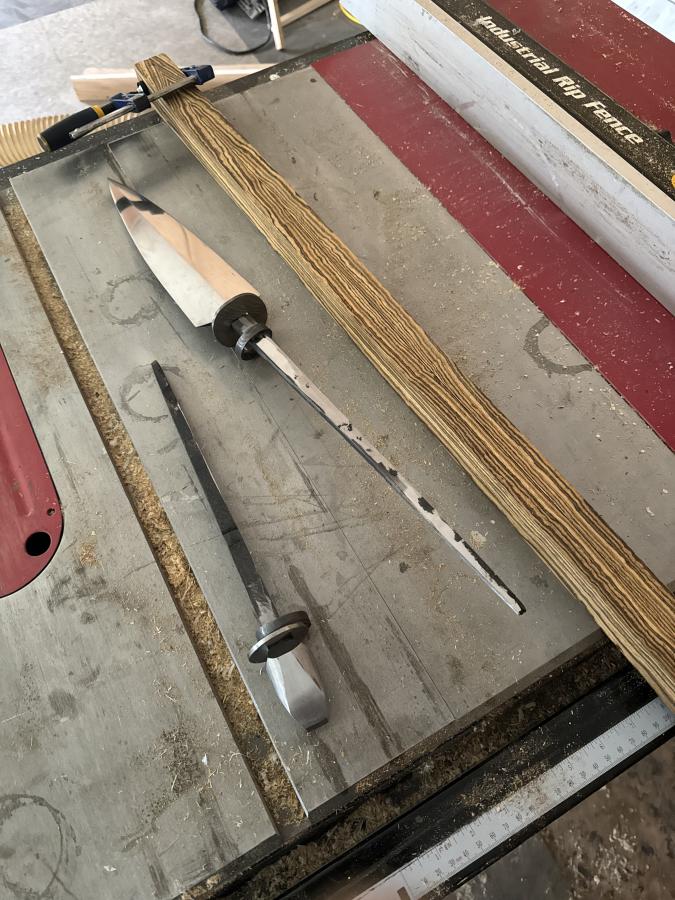
My original plan for the handle was to laminate some bamboo, until I discovered that that is an extremely fiddly job suitable only for the fly-tying set and for Japanese craftsmen. Instead, I grabbed a 3′ block of bubinga which I had in the stockroom, and cut it lengthwise, inletted it, laid it up. In the picture above you can see the retaining rings I made to keep the wood from splitting sideways. Making those was really interesting – cut a small 4″ long by 1/2″ piece of damascus from something, heat it and wrap it around a mandrel, then bring it up to welding temperature and try to get it to stick. I got the hang of it pretty quickly and even made a few bracelets. [wearing damascus steel bracelets or rings is a bad idea because if you snag them on something, the part of you that is wearing them will tear apart long before the steel does]
The thing on the side is the “skull duster” or violent counter-balancer. Since the point is heavy, I thought “let’s make the butt heavy too!” so the thing can be used as a sort of evil pugil stick quite unlike a stabbing spear. As it happened, when I went to assemble the whole thing, the butt was going to be too heavy, so I decided on another pattern for the counterbalancer and just ground away at it.
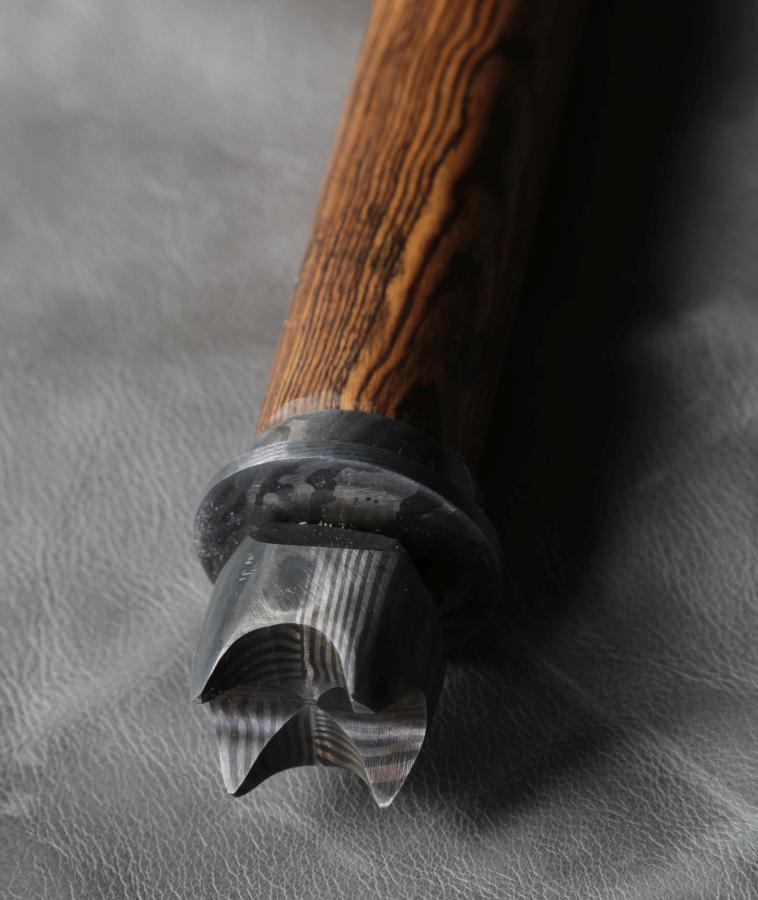
When I welded up the counterbalancer I made a low-layer count bar, cut it into four, cleaned it and basket-weave stacked it, then very carefully welded it because, why not? Meschies-toi et saches la vérité am I right? Anyhow, it came out great. Grinding curves straight into the face of it made for evil points, which are also appropriate on the butt end of a thing like this.
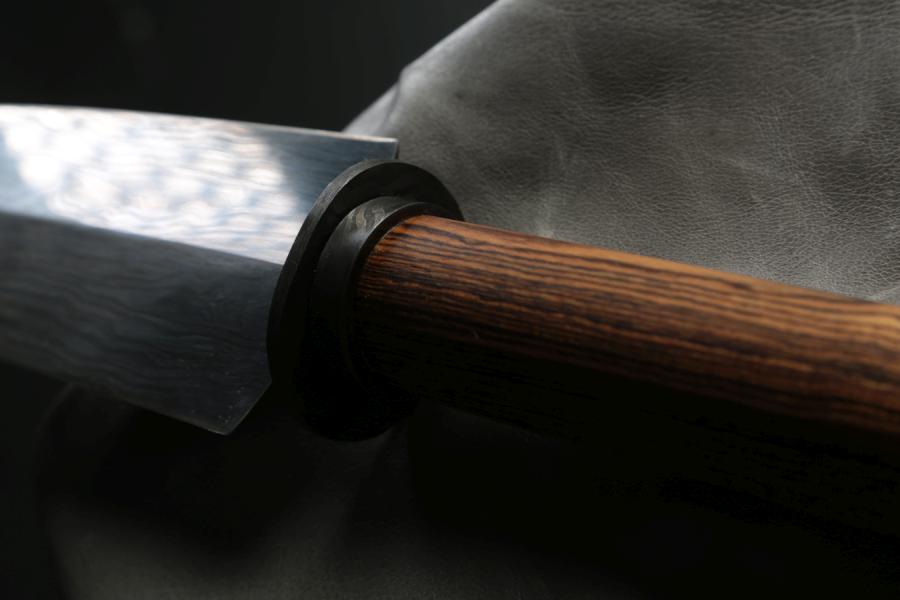
That illustrates the guard assembly. The guard is a simple disk of twist damascus, hammered out, sitting in place to hold down the ring, which is 1/8″ welded twist damascus, fitted tightly over the wood. It won’t really stop a panzer but it’s kind of over the top.

One of the things I really liked about how this turned out is the bevels are machinist flat, and to sharpen them, I only needed to do a tiny little secondary bevel along the edge. In case it hasn’t sunk in, yet, that is a beefy chunk of metal. A samurai or zulu would probably wonder if it was for hunting rhinos. By that point I was simply lost in the fun of the thing.
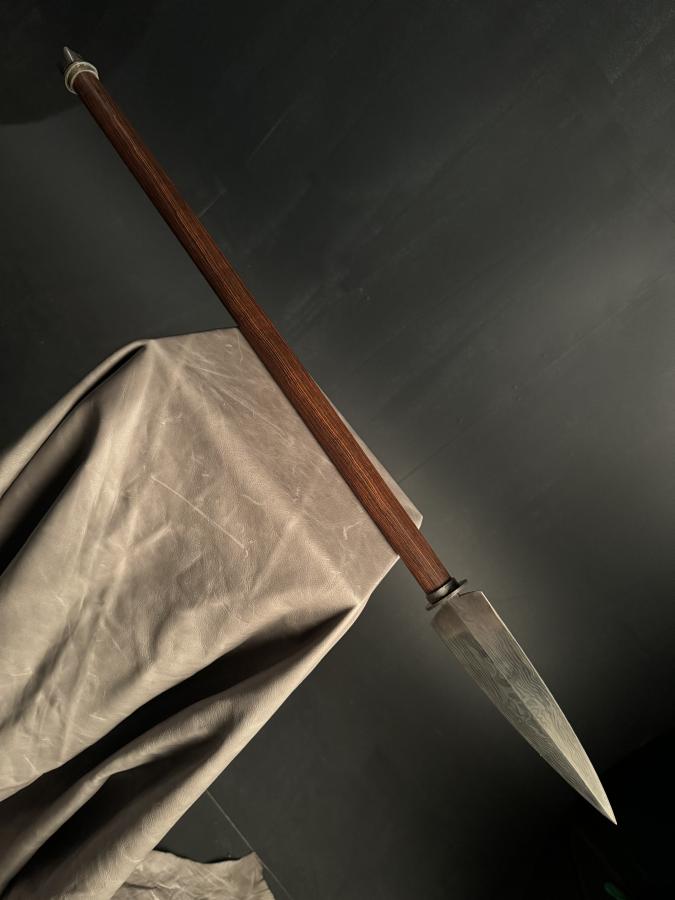
When I say “it’s too heavy” I mean it weighs about 3lb overall. A katana typically comes in around the same, and so does a yari Japanese spear. Traditional iklwa are a little lighter but not much. In my opinion they are lighter because the availability of steel kept them from higher-order stuff [example iklwa].
I did a kind of basic internet-bladesmith-style video of the spear in action [here] against a defenseless melon. Unfortunately the shots where I had the melon wearing a MAGA hat didn’t come out so well because the MAGA hat helped hold together the melon.

I think you might have accidentally stumbled on what the hats are for.
… tough enough to fight a Tesla Cybertruck and win.
Fairly sure most of us could do that with nothing more than a full bladder.
very pretty.
I don’t know the actual history/reasoning, so I could very well be wrong here, but I feel that spears, polearms, etc. are so frequently socketed is because the socket would help keep the wood together, where as having a tang/notch would make it prone to splitting, especially with the long pole acting as a lever and increasing the torque against just a portion of the wood. I think the socket would kind of “bind” the wood together, and enable the whole of the wooden haft to take the forces from a swing or a flex during a thrust against a hard target. or something…
I once had a winter term biology trip to SE Asia, and picked up a ratan wallking stick for a buck or two. really light, and really strong. flexes a lot more than most wood, so probably wouldn’t work for an swinging weapon, but I wonder how it would do for a spear. Anyways, I ended up taking it home with me after hiking around a bunch of rainforest, eventually putting some tung oil on it and some copper caps on the ends, and took it on a bunch of backpacking trips and such, and it held up quite well.
Have I mentioned my terrible idea of a hori-hori (as a backpacking trowel), adapted to fit (quickly) on the end of a walking stick, so that one can fend off a bear/boar/cavalry charge (probably equally likely…) while backpacking….
glad to see some more pointy-stuff posts. :)
ooh, very cool. could have added a couple of big quillons and made it a boar spear :P
You make the coolest stuff. I still love my kitchen knife.
Beautiful and lethal, I love it. I still love my eye gouger.
Lochaber @3: Rattan is often used for sparring-safe practice spears in HEMA and suchlike, because it’s flexible and light. Real spear would use a harder, less flexible wood like ash, because more flex means less energy transferred to the target.
An amazing and beautiful spear. I really see the appeal of having deadly sharp things around; I do carry a pocket knife everywhere so I can cut open bales of hay and so on, and I’ve been tempted recently to get a bigger, sharper, more wicked knife for such mundane tasks, just because of the joy of using such a thing. I think you should carry on making deadly sharp things, as I think the world needs more of them. Also, they make you happy, that’s so important to find joy in these days! (Although yes, no need to get buried in piles of them… hmmm… local farmer’s market? They have melons and vegetables that need to be chopped, after all!)
kestrel has an idea about making as many knives as make you happy, then selling them. I’m not sure that a farmers market is the right place since I associate that with food rather than implements. Do you have any country auctions in your neck of the woods? 8-)
I was fun to read about this pretty toy.
That thing is just beautiful! I love when you show us the pictures from along the way as you create and build!
Another story about Spears:
Britney Spears Lands in Cabo on Same Day She Announces Move to Mexico
Gorgeous and lethal is often a winning combination.
I’ve never considered why spears are generally socketed rather than tanged. There are Icelandic stories that tell of iron filled spear shafts, and a large, sharp spear being used to cleave an opponent from shoulder to groin.
You don’t want to throw your spear in a fight, but removing the rivet first makes it less likely your own spear will be used against you if you do throw and miss.
There are multiple examples of Frankish and Norse blades that were inlaid with intricate gold, silver, copper, etc. I’m sure they gleamed and glittered in the sun with many colors, just like Joyeuse.
I found the shots of the bits of melon flying at the camera while the butt was being tested highly artistic. The pattern welding on both blade and butt is masterfully done.
Photos of Viking age spears including one with inlays can be found at the link, along with construction details, fun facts about spear fighting, and relevant passages from various Sagas. It is sad that iron corrodes, but it is very cool that you can actually see the differences in hardness between the pattern welding in the main body of the blade, the exquisitely smithed edges, and any decoration or engraving material.
https://www.hurstwic.org/history/articles/manufacturing/text/viking_spear.htm
This is a lovely object. Fantastic work.
what a great weapons looks very cool
Onkar Singh:
what a great weapons looks very cool
Thank you! It was way more work than I want to do again