
© Charly, all rights reserved. Click for full size.

© Charly, all rights reserved. Click for full size.

© Charly, all rights reserved. Click for full size.
© Charly, all rights reserved. Click for full size.
© Charly, all rights reserved. Click for full size.
© Charly, all rights reserved. Click for full size.
I was cutting wood for knives and this fellow was hiding in the pile on a piece of maple branch. I nearly inadvertently squashed it, but luckily it got away in the end unharmed. I have no clue what species it is, but it is fairly big. The cephalothorax and abdomen together were about as big as my thumbnail, that’s about 15 mm. So with the legs and all it exceeded the size of a 2 € coin. Pictures are below the fold. [Read more…]
Near where my auntie lives is a small tram depo. I went for a walk and ended up there and I noticed that the walls are covered with graffiti. A passer-by told me that it is fresh, just a few weeks old. Thus it was not yet defaced by other, less artistically inclined and more vandalous graffitiers. I will post pictures probably without much comment in the next few days. There is not much to talk about.

© Charly, all rights reserved. Click for full size.

© Charly, all rights reserved. Click for full size.

© Charly, all rights reserved. Click for full size.
Not a grand finale I am afraid. Just a few more pictures of trees.
First, the view that meets people upon entering the garden.

© Charly, all rights reserved. Click for full size.
That huge Chamaecyparis pissifera on the left is absolutely gorgeous. It is over thirty years old. And the small birch in the center originally just happened to sprout there as a weed towards the end of my university studies, so it is somewhere around 24 years old. At that time I was really getting into growing bonsai trees and my aunt has seen some when she was visiting. And it gave her the idea to let the birch live and just prune it so it does not grow into a full-sized tree but remains small-ish, like bonsai. She seems to be fond of the tree.
And the last picture that I have is of a blooming Magnolia hugging the southern wall.

© Charly, all rights reserved. Click for full size.
I took lots more pictures during this trip, but not in my aunt’s garden. That will be another series – stay tuned.
My aunt has a huge pear tree behind the house. She does not have very many pears though, because she has a lot of junipers in her garden, and junipers and pears in the same spot do not match – Gymnosporium sabinae abounds and is impossible to eradicate. But the tree still grows and blooms every spring.

© Charly, all rights reserved. Click for full size.

© Charly, all rights reserved. Click for full size.
Then there are several small apple trees. I love apple tree blossoms, they are my favorite. And when uploading these, I found out that FtB is broken, and deleting and replacing once uploaded wrong image with a different one of the same name does not work for whatever reason. FtB retains the old image even when I “delete permanently” it.

© Charly, all rights reserved. Click for full size.
 © Charly, all rights reserved. Click for full size.
Then there is the one issue where I am far more successful than my aunt. And in part, it is due to the unfavorable climate. I live at a much higher elevation where the winter temperatures are very low. That is why my fig trees are in greenhouses, where they have a higher chance of surviving winter in good enough shape to bear fruit in the summer. In fact, these last two years I had several kg of late lower quality figs each October and at least a few dkg of fresh high-quality figs in the summer. This year looks extremely promising, my fig trees are covered in nearly golfball-sized green figs already, but my aunt is not so lucky. Her fig tree, although a clone of the same stock as mine (I am the one who obtained them from one university professor during my studies) does bear very little fruit and very inconsistently, and this year during my visit she only had a few bare twigs. When looking closer you can see that the tree almost every year freezes down to the roots and sprouts anew, something that happens to me once in a while too, but to my aunt, it happens more often. Because hers is outdoors and central Europe is just too cold even at its warmest.

© Charly, all rights reserved. Click for full size.
I forgot to ask whether she got any apricots from her young and tiny apricot tree yet. I have seen no sign of blooms or fruit this spring.

© Charly, all rights reserved. Click for full size.
And last not a tree but a bush – red currant that looks recently planted. We used to have many bushes around the garden, red and black currant. My grandfather made wine out of them, but my father was strongly recommended to not drink it after he passed a kidney stone. And passing a kidney stone is an unpleasant enough experience to not want to repeat it, so the winemaking stopped after my grandfather died. The bushes lingered on for a few years still, but then caught some disease and started dying off, so they were all dug up and our garden no longer has any currants in it. The same happened to our neighbour’s currants.

© Charly, all rights reserved. Click for full size.
There are several colors of sempervivum around the garden, and this red cluster near the old well is particularly beautiful in combination with its surroundings.

© Charly, all rights reserved. Click for full size.
Then there is this bowl with what looks like sempervivum but is a different species whose name completely skipped my mind. That is the reason why it is in a bowl – unlike sempervivum, this one is not frost-hardy species.

© Charly, all rights reserved. Click for full size.
There are also several clusters of various sedum species, but I did not make extra pictures of those since they are tiny. What is not tiny, however, is this little opuntia. The fruit (“prickly pear”) is edible, although not particularly tasty according to my aunt. There are only several cacti species that are frost resistant enough to survive the winter here, even in the much milder winters in the area where my aunt lives. And if frost does not kill them, then the overabundance of water will. This one has survived several decades under the careful care of my aunt and it looks healthier than mine in a flower pot.

© Charly, all rights reserved. Click for full size.
Today, I had to change the zeolite and charcoal in the end filter at my wastewater treatment facility and other associated chores – like pumping out most of the water and removing some of the dead leaves from the end pond, etc. I usually do my best not to harm any critters whilst doing this. I counted at least five frogs and ten damselfly larvae in the pond and when changing the zeolite in the filter this poor spider lady carrying an egg sac fell into the filter from I do not know where. She was a bit wet and thus not as agile afterward as these wolf spiders normally are, thus I could take out my phone and take some pictures. She was still way too quick for comfort so I only got two where she is in focus. Pictures are below the fold.
It was just a matter of time, wasn’t it? And with the installation of actual working lights in our cellar, I had not just enough illumination, but also work space again to do some resin work.
Now, in between the last time I did this and now I invested into two things:
1: sanding paper up to 200 grit for the small disk sander that I have
2: A small bench grinder to polish the pieces.
Between the two of them, it saves probably 70% of the annoying work. Instead of having to start hand sanding at about 200 grit, I started at 2000. Now, there is even finer sanding paper for the machine, but that wouldn’t be very helpful, since the sander is, of course, a flat surface and I want the pieces round, so a few, really just a few minutes of hand sanding with the paper on a soft sponge are needed. Then polishing is a treat (provided I hold tight on the pieces and don’t have them shot into orbit).
With the resin done it’s always a question of how to turn them into pendants. When they come out of standard moulds, they fit standard bezels, but these here don’t. Wire wrapping is an option, but being no good at it the results are often not satisfying. It also takes the focus away from the resin pieces I think. Now with the beads bringing me so much fun, why not combine?

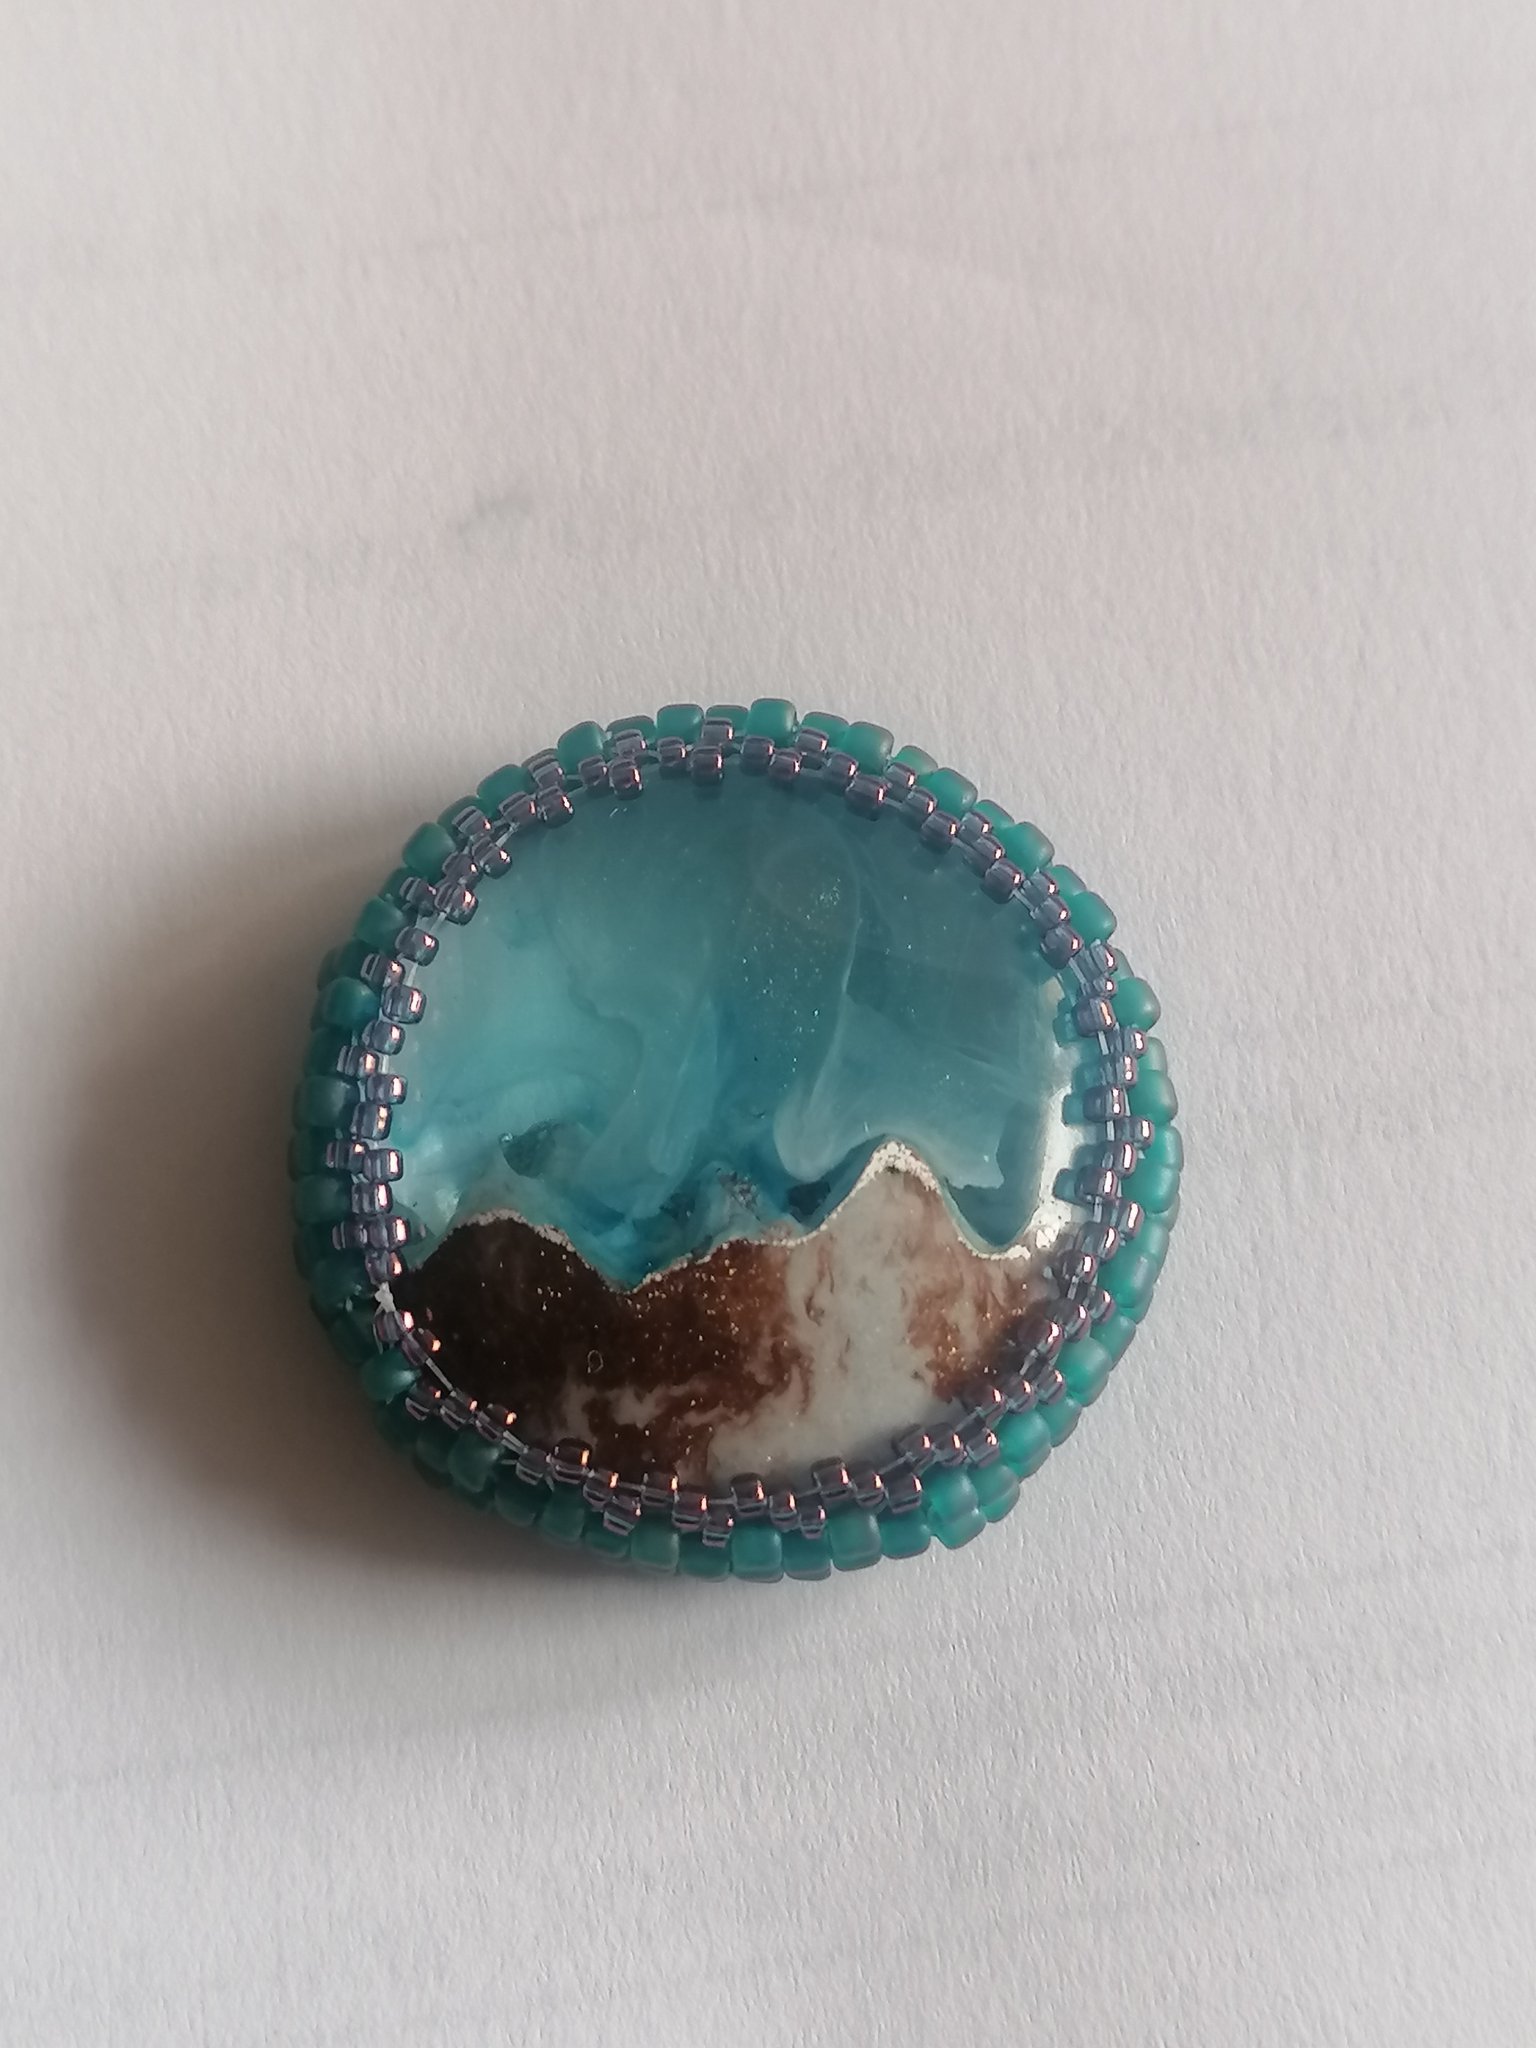
©Giliell, all rights reserved
This is one of those “sea and land pieces” that I love so much, even though I’m not completely happy with it. I shouldn’t have added the metallic pigment, because there was a layer of flitter that settled somewhere in the middle that makes it slightly opaque. The bezel is made from seed beads in two different sizes and some small crystals.
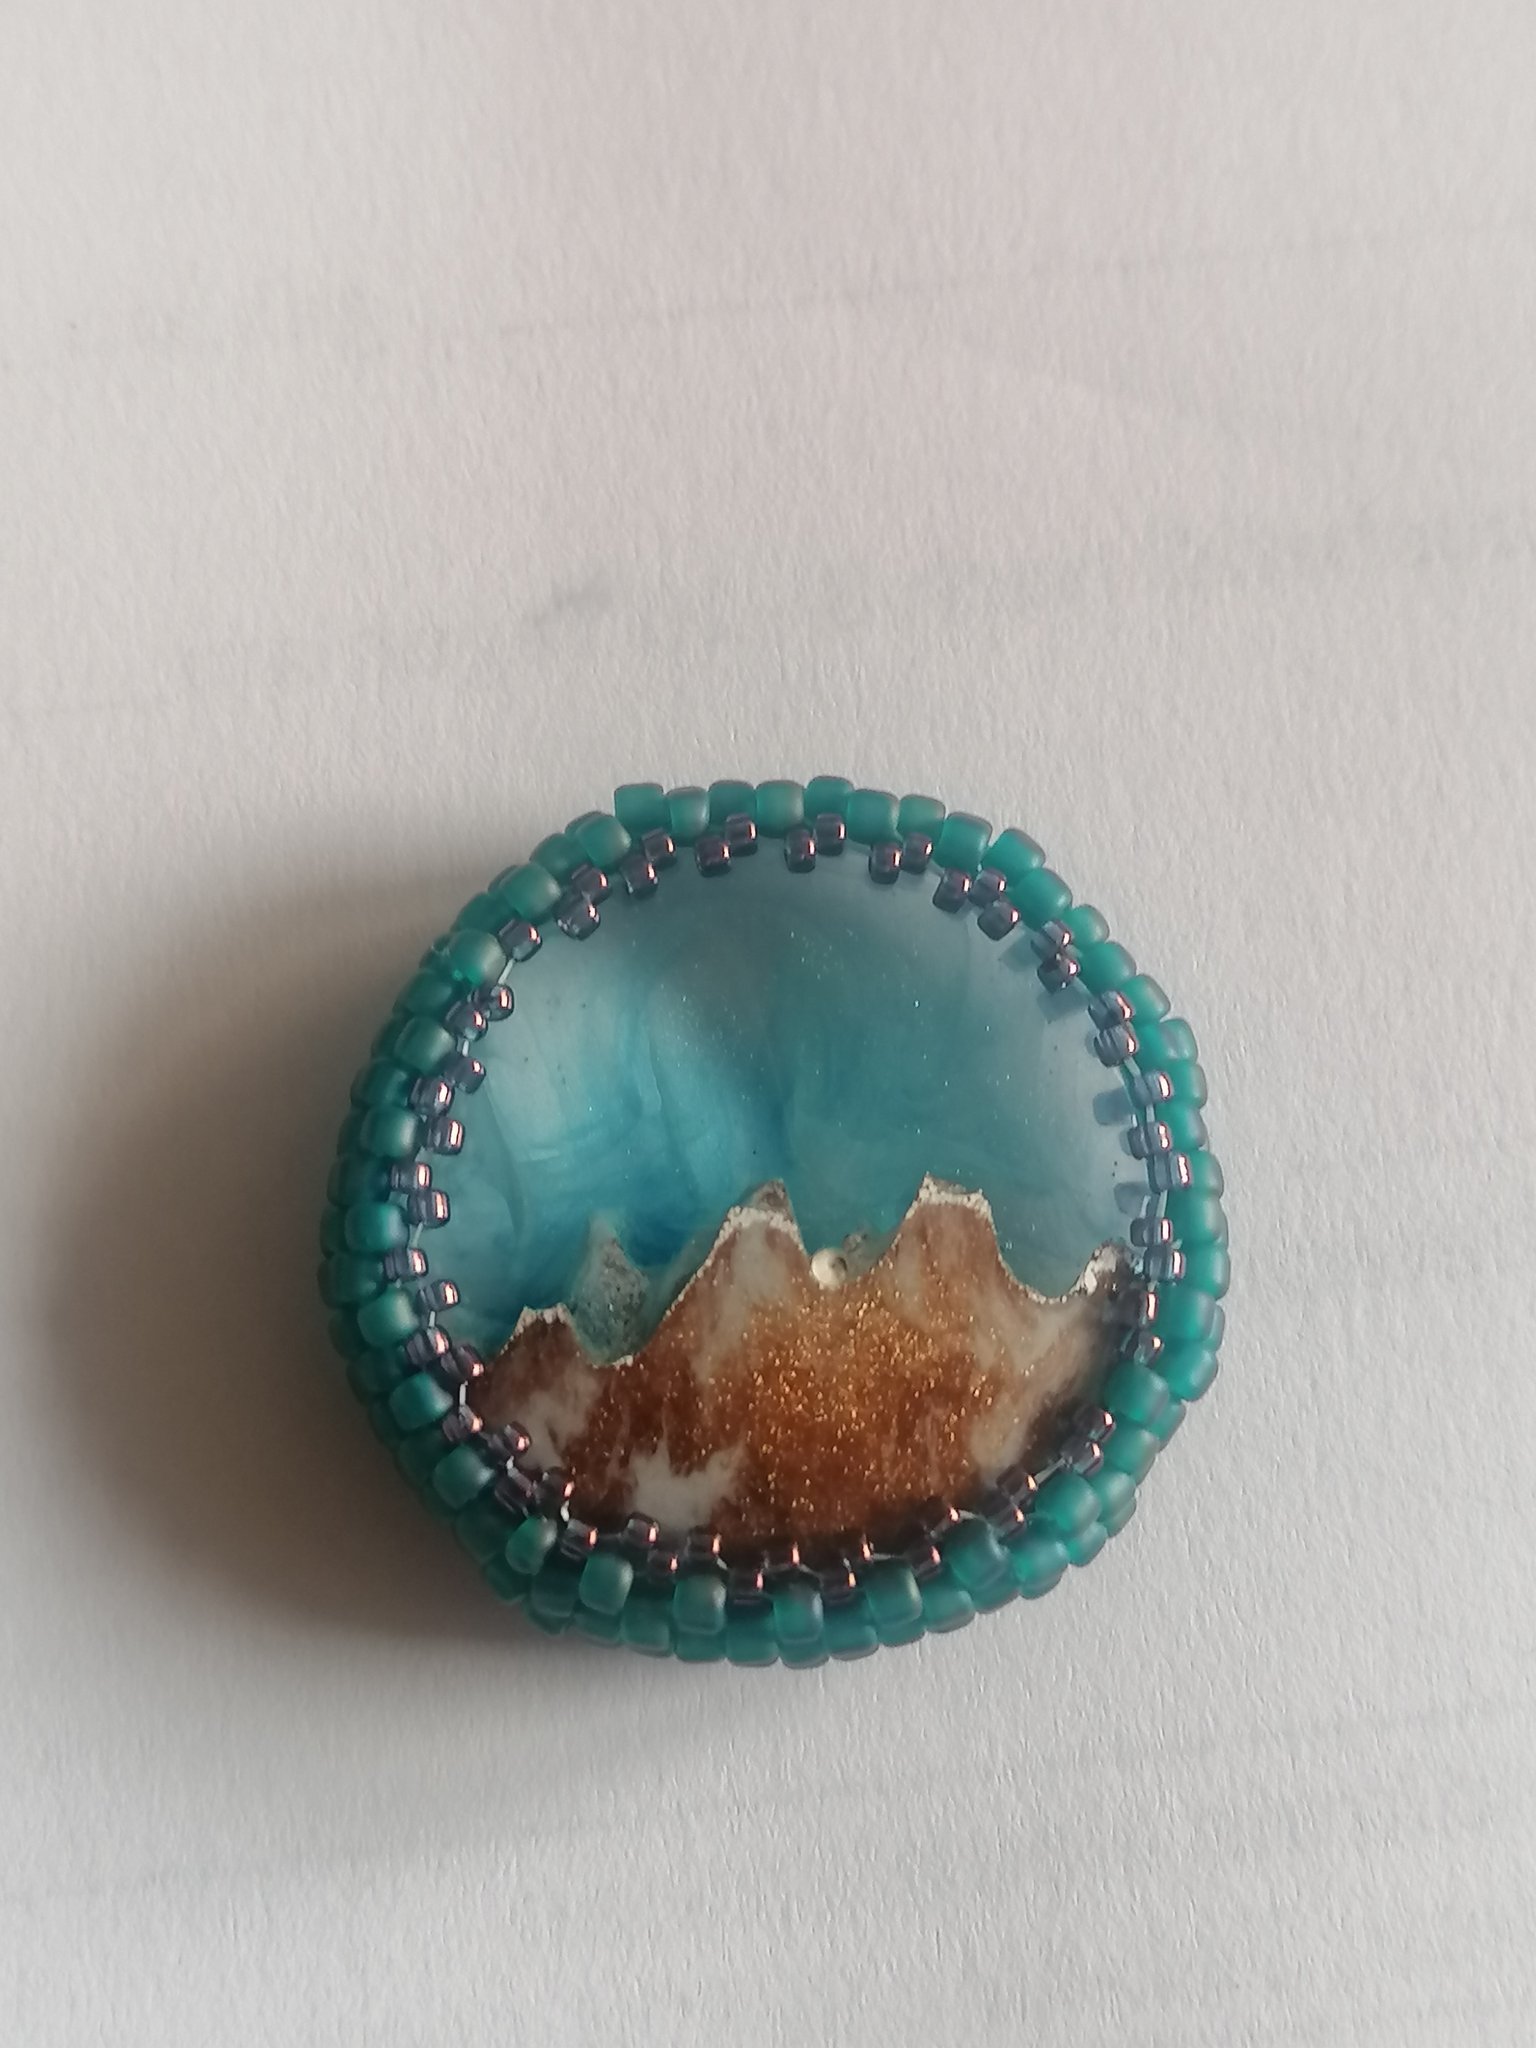
©Giliell, all rights reserved
This one is gorgeous, and I can’t decide which side I love better. I think I’ll try something similar again with the attempt at creating northern lights. This started out rectangular, btw.
©Giliell, all rights reserved
The last piece defied my attempts at beading, because the curve gets too narrow at the top.
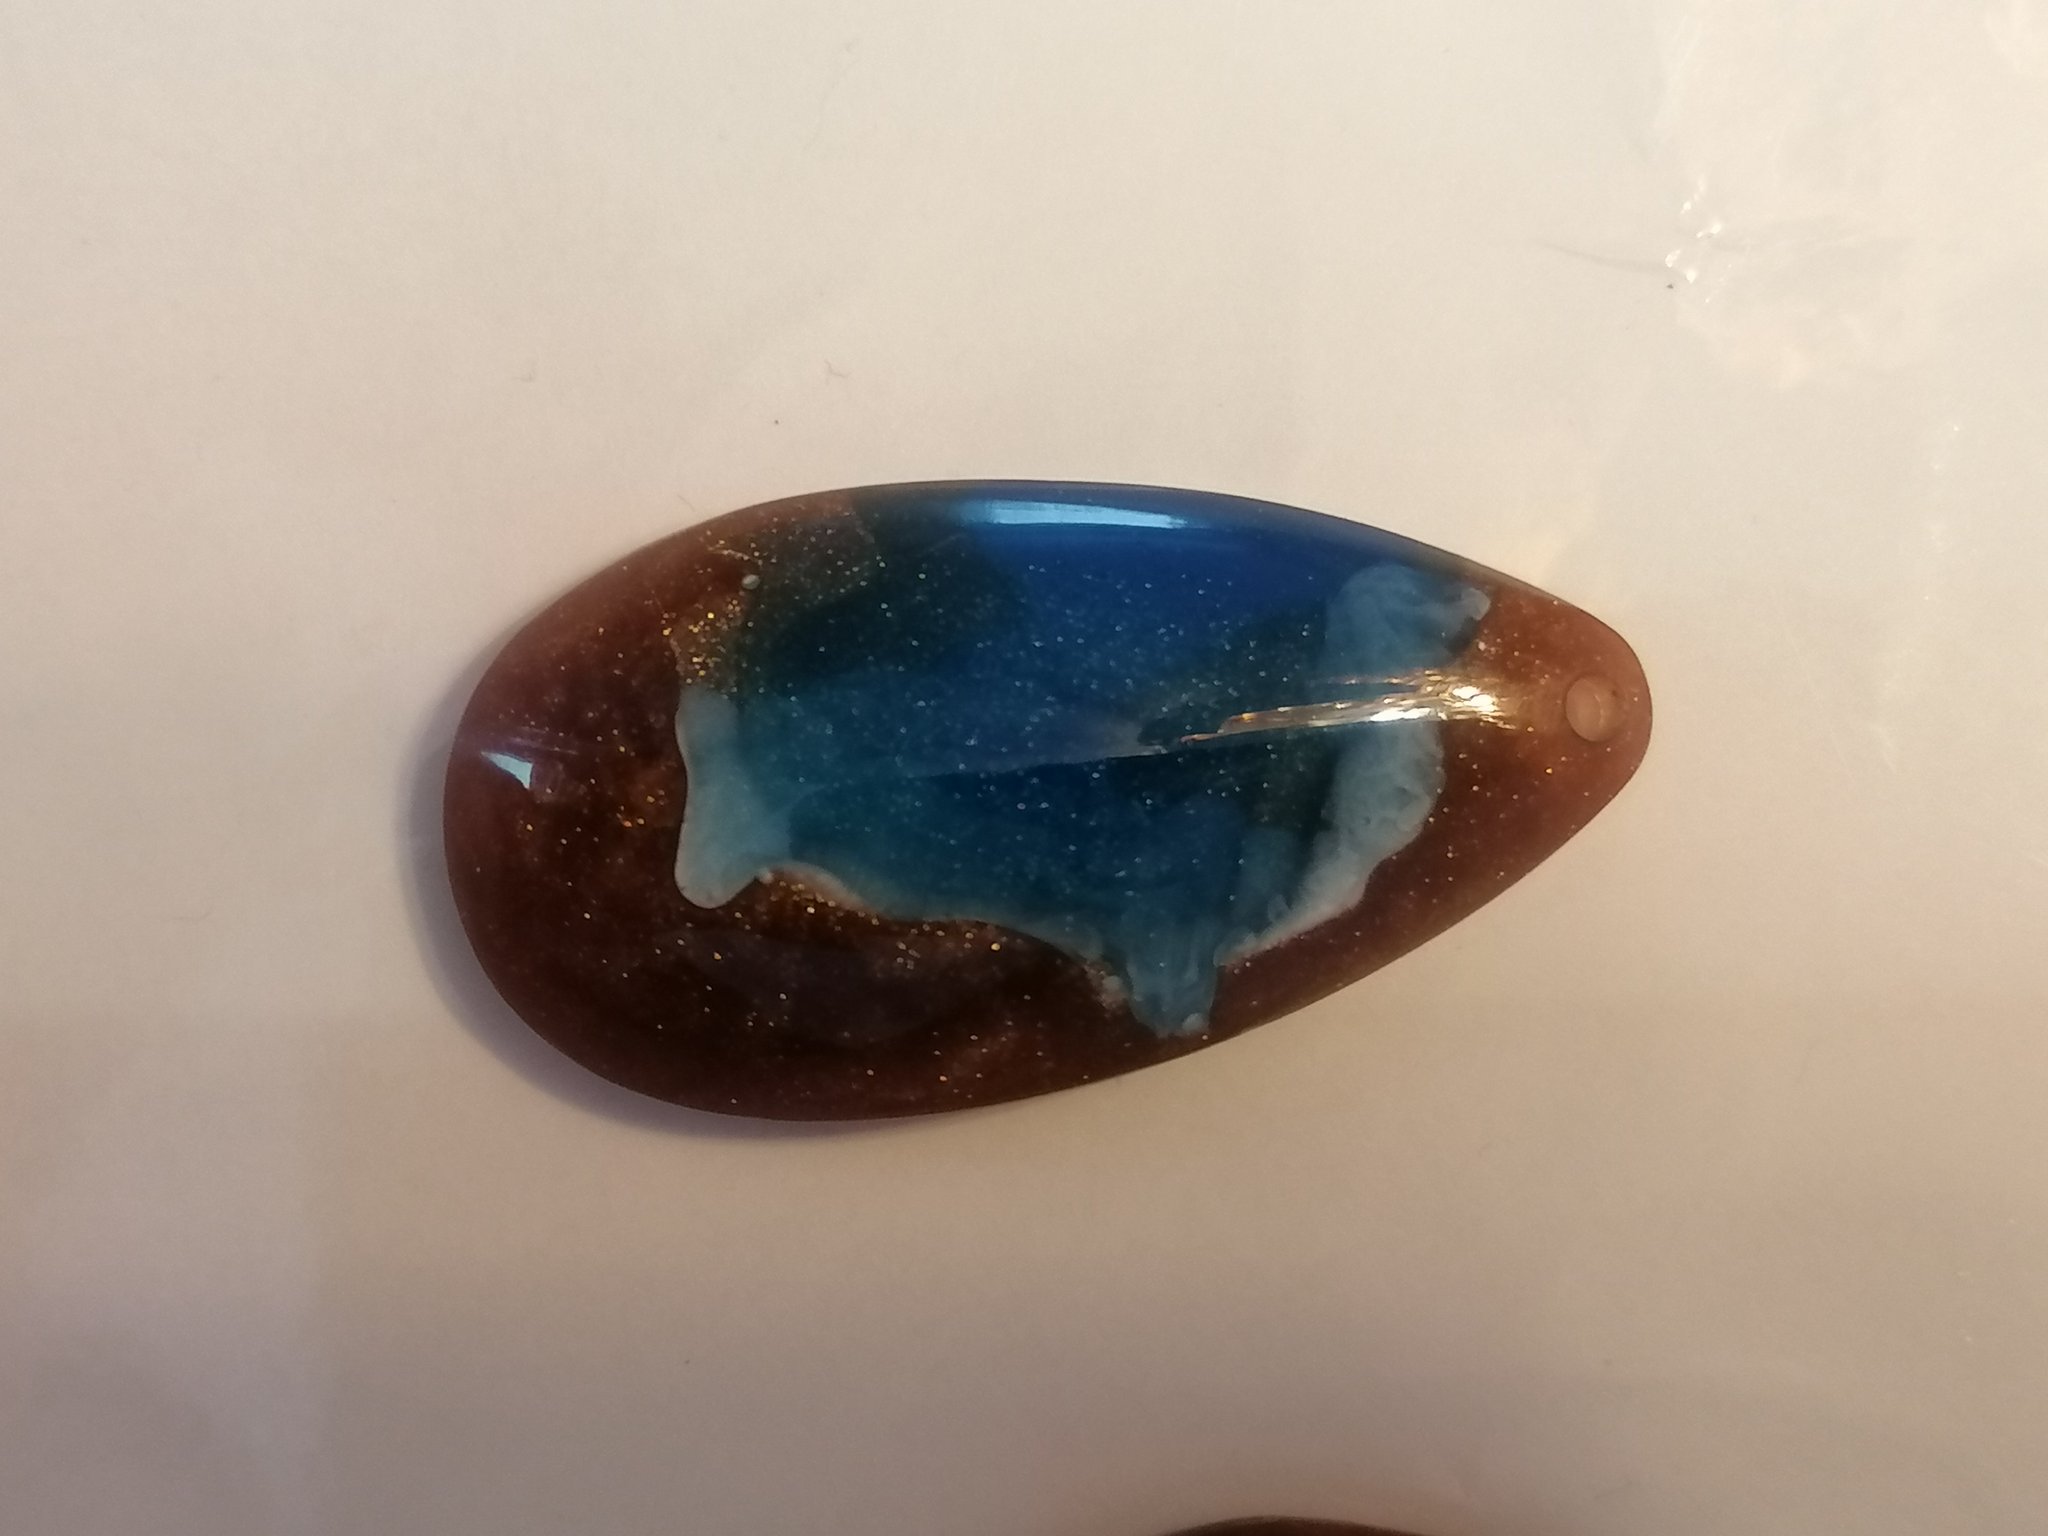
©Giliell, all rights reserved
It has the same issue as the first one, but look at that shine!
Not the biggest collection imaginable, but the strategically put tulips here and there resulted in quite a few various pictures.

© Charly, all rights reserved. Click for full size.

© Charly, all rights reserved. Click for full size.

© Charly, all rights reserved. Click for full size.

© Charly, all rights reserved. Click for full size.

© Charly, all rights reserved. Click for full size.

© Charly, all rights reserved. Click for full size.

© Charly, all rights reserved. Click for full size.

© Charly, all rights reserved. Click for full size.

© Charly, all rights reserved. Click for full size.
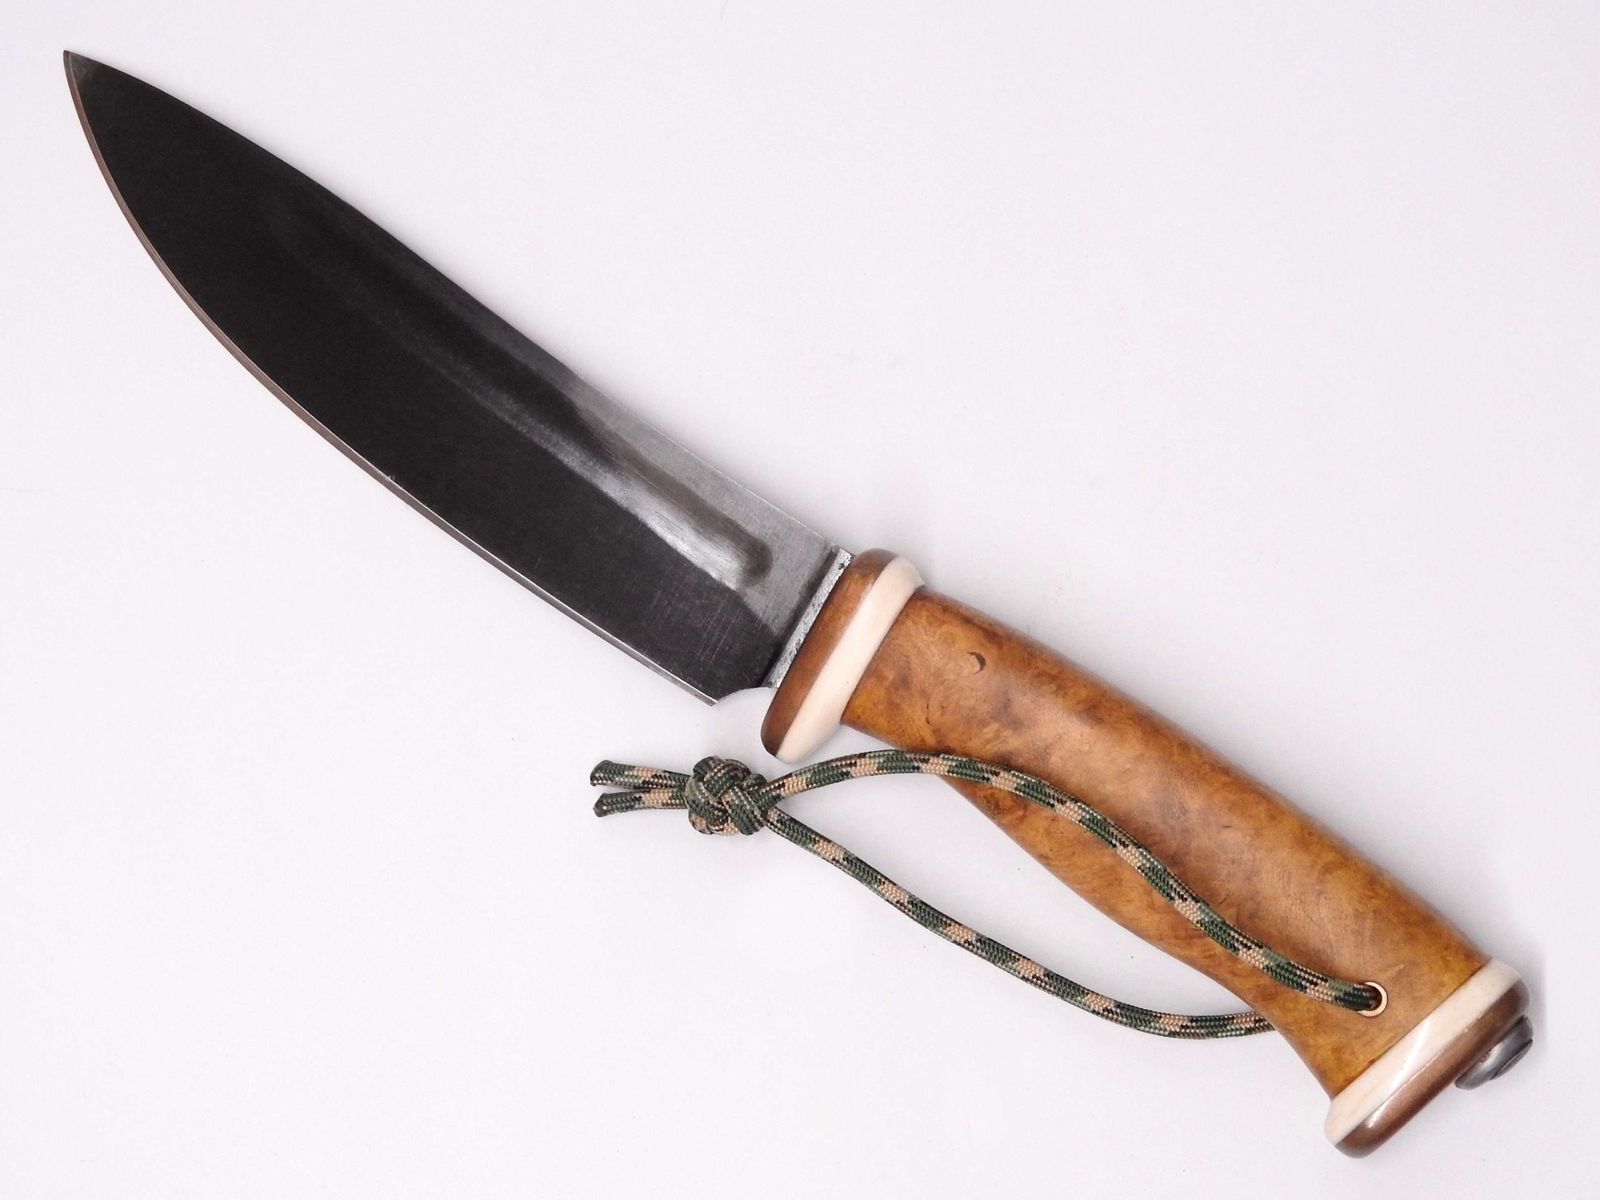
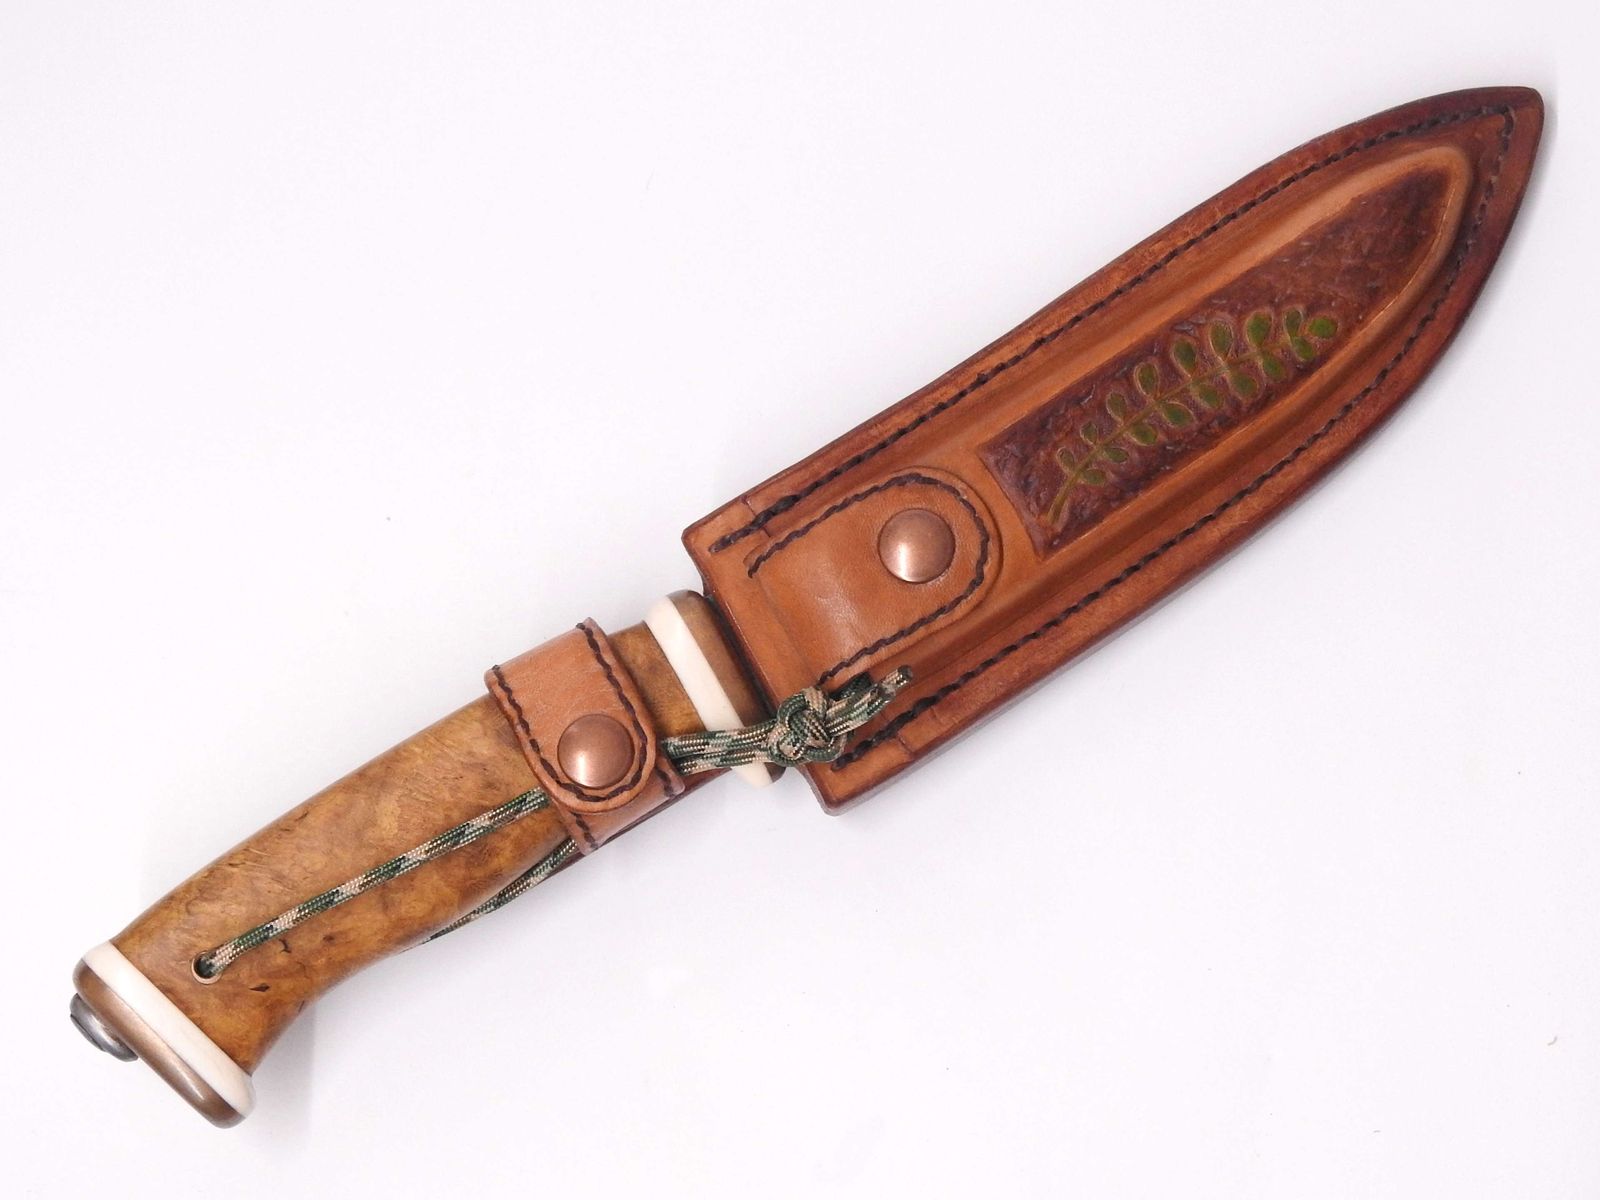
I got a commission for a knife, which did make me happy a bit. Making a commission has one huge advantage over making a knife just so – the existential dread questions “Will somebody want this?” and “Will they be able to afford this?” are both answered in the affirmative. And the requests were not unreasonable – a big camping knife with a striker and a ferrocerium rod. Handle from black locust wood, leather sheath with some black-locust ornament, if possible bark-like surface. Black locust has some personal significance to the customer, I did not ask what it is. And they have chosen one of my already finished blades, so I could go right ahead.

© Charly, all rights reserved. Click for full size.
I gave them a choice of three types of black locust wood – untreated, treated with ammonia, and a very expensive piece of burl that I bought some time ago and did not deem worthy of a blade yet. They chose the expensive burl, and I must say it does look very fancy. I infused the handle with resin, although it is impossible to get a complete soak on wood as hard as black locust. But a few mm is just fine. The bolster and pommel are stamped 1 mm bronze. Not polished, just brushed with a steel brush and allowed to build up patina. Cow bone spacers for contrast.
© Charly, all rights reserved. Click for full size.
It is the same design as the “not a masterpiece” knife, but the blade is from oak bark blackened spring steel. For some reason the blackening reacts differently with the unquenched steel at the spine, making this funny light triangle on it. I would very much like to know the reason for this different reaction – the chemical composition of the steel is identical throughout, it is the crystalline structure that changes. Yet, evidently, various chemicals react differently with hardened and unhardened steel.

© Charly, all rights reserved. Click for full size.
Google yielded no usable results for putting tree bark texture on leather, maybe nobody managed it yet. So I had to improvise a bit. I ended up with finding several pieces of sharp basalt gravel and pressing the ragged edges into the leather. It does look tree-bark-ish, I think. On the sketch, it looked a bit empty though, so we agreed to put a black locust leaf in there too. With a bit more refinement the texture would probably look even more like tree bark, but I had to end the experimentation at some point, otherwise, I would not be done on time. The tip of the leather sheath is darker, I have applied patina shading there. Now that I think of it in the photos it looks a tad peculiar. It looks better hanging tip down. Lesson learned – photograph sheaths and knives in them tip-down. Next time, the lesson will be promptly forgotten.

© Charly, all rights reserved. Click for full size.
I could not buy bronze tubes for the striker and rod handles, it would seem nobody in CZ sells them. I have bought rods, but drilling a rod concentrically without a lathe has proven to be an impossible task so far. So I made the handles from brass and I coated them with a thin bronze layer electrolytically. The patina has built up almost immediately, which is nice. It took several days for it to build up on the knife bolster and pommel.
© Charly, all rights reserved. Click for full size.

© Charly, all rights reserved. Click for full size.
It is a big, heavy-duty knife weighing 224 g alone, 447 g with the sheath and accessories. Blade 4 mm thick at the base, tapering towards the tip. Fullered, flat grind. Point of balance at index finger right behind the bolster for a comfortable grip and control when cutting food. When the long grip is held towards the pommel, it gives the knife a nice heft for chopping, for example, when making splinters for starting a fire.
The knife will be given to its owner next weekend. I do hope they will be happy with it and get some use out of it.
Very rarely do I have an opportunity to visit my favorite aunt in the spring when her rock garden is in full bloom, so today year when I got lucky I took a ton of pictures. I will post them piecemeal over a non-specified period of time.
This is the outside view of her house and the garden. You can already see the multitude of shapes and colors.

© Charly, all rights reserved. Click for full size.
And to start things first a picture of a small pond with water lilies. They are not blooming yet, so just a little anecdote to amuse you: When I was a little kid, I liked to play in this garden by running and jumping on the rocks. My aunt did not mid as long as I did not damage any plants, which I somehow managed. But she did warn me to not do it near the pond because I could fall in it. So of course I ignored that instruction and one summer day I did indeed fall into the pond, butt first. There was laughing and Itoldyousoing on my aunt’s part and wailing and gnashing of teef on my part. Luckily I did not hurt my self nor the water lillies.

© Charly, all rights reserved. Click for full size.
And the flowers of spring.
These ones are a bit different from my usual work, where the effect is created by artfully and precisely stringing beads. These two are created by stringing a lot of beads together. Nobody will ever notice if the leaves are three seed beads apart or four, just that there’s a lot of them.

©Giliell, all rights reserved

©Giliell, all rights reserved

©Giliell, all rights reserved
I al
©Giliell, all rights reserved
so made some matching earrings with the leftover beads:
The bracelet actually came first. It’s in my favourite colour: all the hues of blue. The technique is the same for both: A row of large seed beads is strung up and then you keep adding the different elements, always working from one end to the other, spacing them more or less regularly.

©Giliell, all rights reserved

©Giliell, all rights reserved

©Giliell, all rights reserved

©Giliell, all rights reserved
There’s another major difference between this project and the usual ones: cost. A normal bracelet /set of earrings hast a cost of a few bucks. Even the “Mermaid” one was definitely under 10€ , even with the Bohemian crystals. these are quite expensive. Sure, one bag of flower beads or leaves isn’t much, just around 3 €, but you need a lot o them, so each piece comes down to 35 to 40 € is beads alone, hours worked not counted. I’ll call them my easter gift, I could spend money more foolishly.
… I am really proud of this knife and I think I have done a good job. I genuinely think I am getting better.
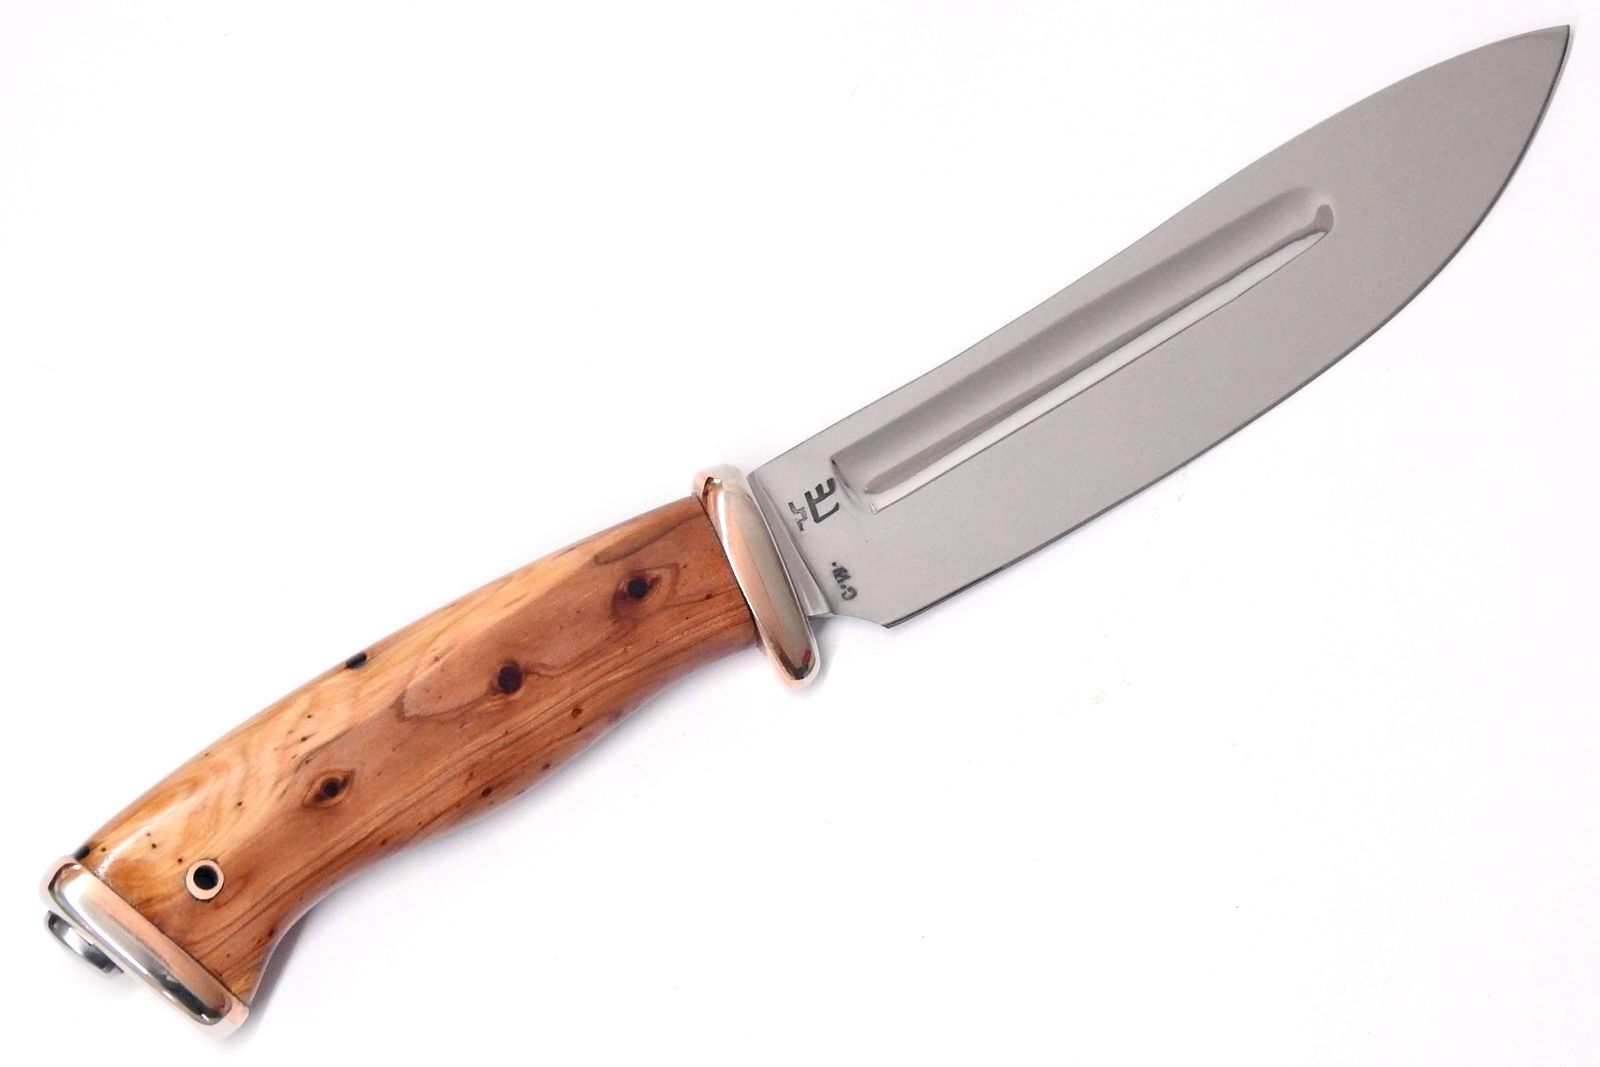
You have already seen the blade, twice. It is a big, fullered, mirror-polished, 5 mm thick at the base blade based on my working knife from a failed attempt at making a machete and a bushcraft knife that I have made for my friend. It has some issues – the fullers are not entirely regular and they are not symmetrically positioned, especially towards the tip. But it is a well-hardened blade and the geometry has been already tried and tested by both me and my friend and it is suitable for camping tasks, from preparing small firewood to cutting BBQ ingredients. So functionally, it is a good blade.
But the asymmetry was bugging me, so I have decided to make a visually asymmetrical handle too. First I have tried to use a piece of black elder, a light-colored wood with dark knots that I have thought would work nicely with the mirror polish. But that piece of wood failed me so I had to seek out an alternative
And I am glad it turned out that way because the alternative I chose was a piece of an old and gnarly juniper wood (probably Juniperus x media). Any piece of that has pretty much guaranteed stark asymmetry in every piece and it is a reasonably hard softwood (oh the peculiarities of the English language!) with very small pores, so it is suitable for small woodwork.
The wood also has two distinct colors – white-ish sapwood and reddish-brown heartwood and lots of small knots, which quite coincidentally ended up positioned in – in my opinion – aesthetically quite pleasing places, especially on the right side. It has curly bits too, so it changes in some places color depending on the viewing angle. My original intent was to make the fittings from pakfong with bone plates for color contrast, but I thought that a combination of pakfong and bronze would look better and would fit the wood’s color palette more. And when I see it, I think I was correct. The pakfong part was stamped out of 1 mm sheets but the bronze half had to be made out of 4 mm sheets simply because I did not want to spend another day making a second set of punches. But I probably will at some point if I make more knives in this design. I was thinking about whether to solder or glue the two halves together and I have decided to go with epoxy glue since I needed to fill the hollows anyway and the knife tang stops them from experiencing any great shearing forces so it should be fine. And if someone uses a knife like this instead of a hammer or tosses it into a fire, then, well, some conditions do not have a cure…
Anyhoo, enough of babbling, here are the pics:
© Charly, all rights reserved. Click for full size.

© Charly, all rights reserved. Click for full size.
It is a big, big boi. ~18 cm long blade, ~14 cm long handle, ~270 gramms. Balanced on the index finger but still packs a punch.
I did not make a sheath yet and I would like to ask you if you do not mind giving me some ideas to consider in the comments. I want to make something really fancy, keeping the two-color scheme. With a pocket for a striker and ferrocerium rod. Maybe some basket-weave with differently colored weaves? Or dragonskin?
I also need to find a suitable paracord, none of those that I have in stock fit the color scheme, I might have to go with a simple beige color.